Il tuo carrello è vuoto!
Mastering System Hooks
In this article we are going to explain how to develop a new WordPress plugin from scratch by focusing on the extendibility of VikAppointments.
Preamble
The goal of this guide is to develop a new plugin to implement the management of the difficulty of the services in VikAppointments. Even if you are not interested in using a similar feature, you might still consider to follow these guide to understand how to build a plugin.
The development of this plugin is divided into several parts:
- Creating the basic structure of the plugin;
- Introducing the field to specify the services difficulty;
- Defining the callback to save the difficulty;
- Display the difficulty into the front-end.
At the end of the article you'll find a .zip archive containing the complete structure of the plugin described in this guide.
Create Plugin Structure
The creation of a new plugin follows the directives defined by the WordPress platform, which can be seen from the link below:
https://developer.wordpress.org/plugins/
The first thing to do is creating a new folder with the following files structure:
- vikappointments-servicesdifficulty
- vikappointments-servicesdifficulty.php
- assets
- style.css
- script.js
- languages
- index.html
PHP
Move to the PHP file and define the class below to start supporting the plugin processor.
<?php
/*
Plugin Name:  VikAppointments Services Difficulty
Plugin URI:   [PLUGIN_WEBSITE]
Description:  Adds support to the services difficulty.
Version:      1.0
Author:       [YOUR_NAME]
Author URI:   [YOUR_WEBSITE]
License:      GPL2
License URI:  https://www.gnu.org/licenses/gpl-2.0.html
Text Domain:  vikappointments-servicesdifficulty
Domain Path:  /languages
*/

// No direct access
defined('ABSPATH') or die('No script kiddies please!');

// define plugin version constant
define('VIKAPPOINTMENTS_SERVICES_DIFFICULTY_VERSION', '1.0');

/**
 * Plugin installer helper class.
 *
 * @since 1.0
 */
final class VikAppointmentsServicesDifficultyInstaller
{
    /**
     * Installs the plugin database.
     *
     * @return  void
     */
    public static function install()
    {

    }

    /**
     * Uninstalls the plugin database.
     *
     * @return  void
     */
    public function uninstall()
    {

    }
}

// handle plugin installation
register_activation_hook(__FILE__, ['VikAppointmentsServicesDifficultyInstaller', 'install']);
// handle plugin uninstallation
register_uninstall_hook(__FILE__, ['VikAppointmentsServicesDifficultyInstaller', 'uninstall']);
SQL - Install
Within the main PHP file, we need to declare the body of the VikAppointmentsServicesDifficultyInstaller::install() method, so that we can automatically alter the database during the plugin installation.
// get installed software version
$version = get_option('vikappointments_services_difficulty_version', null);

// check if the plugin has been already installed
if (is_null($version))
{
    global $wpdb;

    // alter services database table
    $q = "ALTER TABLE {$wpdb->prefix}vikappointments_service ADD COLUMN `difficulty` int(3) unsigned DEFAULT 0;";
    $wpdb->query($q);

    // mark the plugin has installed to avoid duplicate installation queries
    update_option('vikappointments_services_difficulty_version', VIKAPPOINTMENTS_SERVICES_DIFFICULTY_VERSION);
}
SQL - Uninstall
Within the main PHP file, we need to declare the body of the VikAppointmentsServicesDifficultyInstaller::uninstall() method, so that we can automatically remove the changes applied to the database when the users confirms the uninstallation of the plugin.
global $wpdb;

// drop created column
$q = "ALTER TABLE {$wpdb->prefix}vikappointments_service DROP COLUMN `difficulty`;";
$wpdb->query($q);

// remove plugin version
delete_option('vikappointments_services_difficulty_version');
Display Difficulty Parameter
The difficulty parameter should be displayed within the management page of a service. It is possible to introduce the field in any supported fieldset. In this example we are going to display an input number at the end of the Details > Service fields box. This can be accomplished by defining a new callback able to respond to the hook used to display new fields. Therefore it is needed to open the created PHP file and append the code below at the end.
add_filter('vikappointments_display_view_service', function($forms, $view)
{
    if (!$forms)
    {
        $forms = [];
    }

    // inject parameters within the details fieldset
    $forms['service'] = [
        // create difficulty input (the key is equals to the parameter name)
        'difficulty' => [
            // display an input number
            'type' => 'number',
            // display the input label
            'label' => __('Difficulty', 'vikappointments-servicesdifficulty'),
            // display an optional description of the field
            'help' => __('Enter here the difficulty (in percentage) of this service.', 'vikappointments-servicesdifficulty'),
            // define the minimum supported value (0%)
            'min' => 0,
            // define the maximum supported value (100%)
            'max' => 100,
            // define the number of supported steps
            'step' => 1,
            // define the default value to use
            'default' => 0,
            // define the last saved value, if any
            'value' => isset($view->service->difficulty) ? (int) $view->service->difficulty : null,
        ],
    ];

    return $forms;
}, 10, 2);
The resulting HTML should look like this one:

Save Difficulty Parameter
Now it is time to handle the saving process by creating a new callback (or event). The latter will be able to fetch the specified difficulty from the request and bind it into the object/array that is going to be saved. Under the callback previously created, we need to register an additional function built as the following one.
add_filter('vikappointments_before_save_service', function($save, &$data)
{
    if ($save === false)
    {
        // saving process already aborted
        return false;
    }

    $data = (array) $data;

    if (isset($_POST['difficulty']))
    {
        // difficulty specified, bind it into the array to save
        $data['difficulty'] = abs((int) $_POST['difficulty']);
    }

    return true;
}, 10, 2);
Display Difficulty in Site
The management of the difficulty parameter has been completed. Now we can move to the front-end section to display the difficulty with a sort of progress bar. In this example we decided to introduce the difficulty within the service details page, immediately before the price.
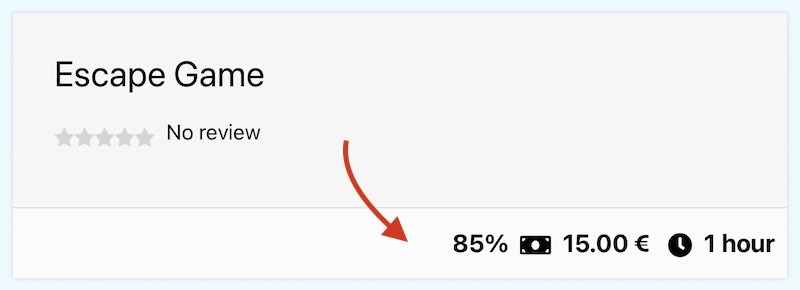
Since there is no hook to manipulate the HTML, it is still possible to introduce new elements into the document via Javascript. In our case, it is enough to include the created .js file (and .css one) just before loading the details of a service.
JS
You should open the created assets/script.js file and introduce the following code.
(function($) {
    'use strict';

    $(function() {
        // create progress bar
        const progressBar = $(
            '<span class="progress-bar" aria-valuenow="0" aria-valuemin="0" aria-valuemax="100"></span>'
        );

        // update progress bar value
        progressBar.css('width', window['serviceDifficulty'] + '%');
        progressBar.attr('aria-valuenow', window['serviceDifficulty']);

        // wrap progress bar in a parent
        const progress = $('<span class="progress"></span>').append(progressBar);

        // create info box
        const infoBox = $('<span class="vap-price-info-box service-difficulty"></span>');

        // append difficulty label
        infoBox.append(
            $('<span class="difficulty-label"></span>')
                .text(wp.i18n.__('Difficulty'))
        );

        // append progress bar
        infoBox.append(progress);

        // append difficulty value
        infoBox.append(
            $('<span class="difficulty-value"></span>')
                .text(window['serviceDifficulty'] + '%')
        );

        // insert info box before the service price
        infoBox.insertBefore('.vapempcontactsp .service-price');
    });
})(jQuery);
CSS
At this point we can open the assets/style.css file and define some rules to improve the layout of the progress box.
.vapempcontactsp .service-difficulty .difficulty-label {
    font-weight: normal;
}
.vapempcontactsp .progress {
    background-color: #eaedf0;
    border-radius: .25rem;
    font-size: .75rem;
}
.vapempcontactsp .progress,
.vapempcontactsp .progress-bar {
    display: inline-block;
    height: 20px;
}
.vapempcontactsp .progress {
    width: 100px;
    overflow: hidden;
    margin: -4px 6px;
    text-align: left;
}
.vapempcontactsp .progress-bar {
    background-color: #da1a35;
}
PHP
Once the CSS and the JS have been properly defined, it is time to load them via PHP. Open the PHP file and register a new callback built as the following one.
add_action('vikappointments_build_service_search_data', function($status, $service)
{
// check whether the service specifies a difficulty
if (empty($service->difficulty))
{
// nope, ignore rendering
return;
}
// load script
wp_enqueue_script(
'vap-serdiff-script',
plugins_url('/assets/script.js', __FILE__),
['jquery'],
VIKAPPOINTMENTS_SERVICES_DIFFICULTY_VERSION
);
// load style
wp_enqueue_style(
'vap-serdiff-style',
plugins_url('/assets/style.css', __FILE__),
[],
VIKAPPOINTMENTS_SERVICES_DIFFICULTY_VERSION
);
// assign service difficulty to a global variable in order to make it accessible from our script file
wp_add_inline_script('vap-serdiff-script', "window['serviceDifficulty'] = {$service->difficulty};");
// add support to i18n
wp_set_script_translations('vap-serdiff-script', 'vikappointments-servicesdifficulty');
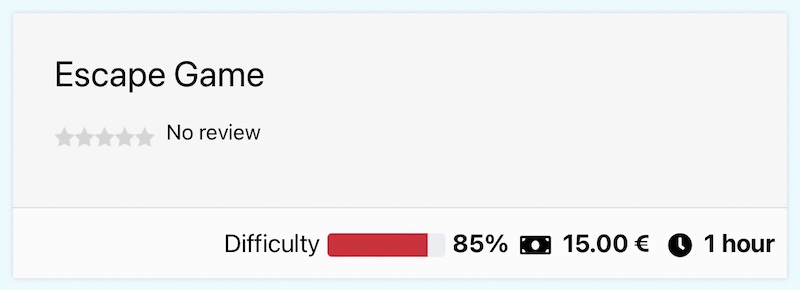
}, 10, 2);Here's how the front-end should display the difficulty bar under the details page of a service.
Conclusion
If you properly followed all the steps, you should now proceed with the installation of the plugin from the back-end of your WordPress. After the installation, don't forget to activate the plugin, otherwise VikAppointments wouldn't be able to trigger the specified hooks.
As pointed in the preamble section, here's the link to download the installer of the plugin described in this example.
Ultimo aggiornamento: 2022-03-04
Utile?