Il tuo carrello è vuoto!
Booking
The Booking section of VikRestaurants contains the Customers, the Reviews, the Coupons and the Invoices.
Customers
The customers view is used to collect all the details of your clients.
A customer will be created automatically every time a new logged-in user places a new order from the front-end. When a user tries to book a new reservation/order when logged-in, in case it is already assigned to a customer, the registered details will be retrieved and used to auto-fill the fields within the confirmation page.
You can see here the number of CONFIRMED reservations/orders made by your customers and you can also sort them to draw up a best-purchaser ranking.
The list lets you search the customers by name e-mail, phone number and billing address.
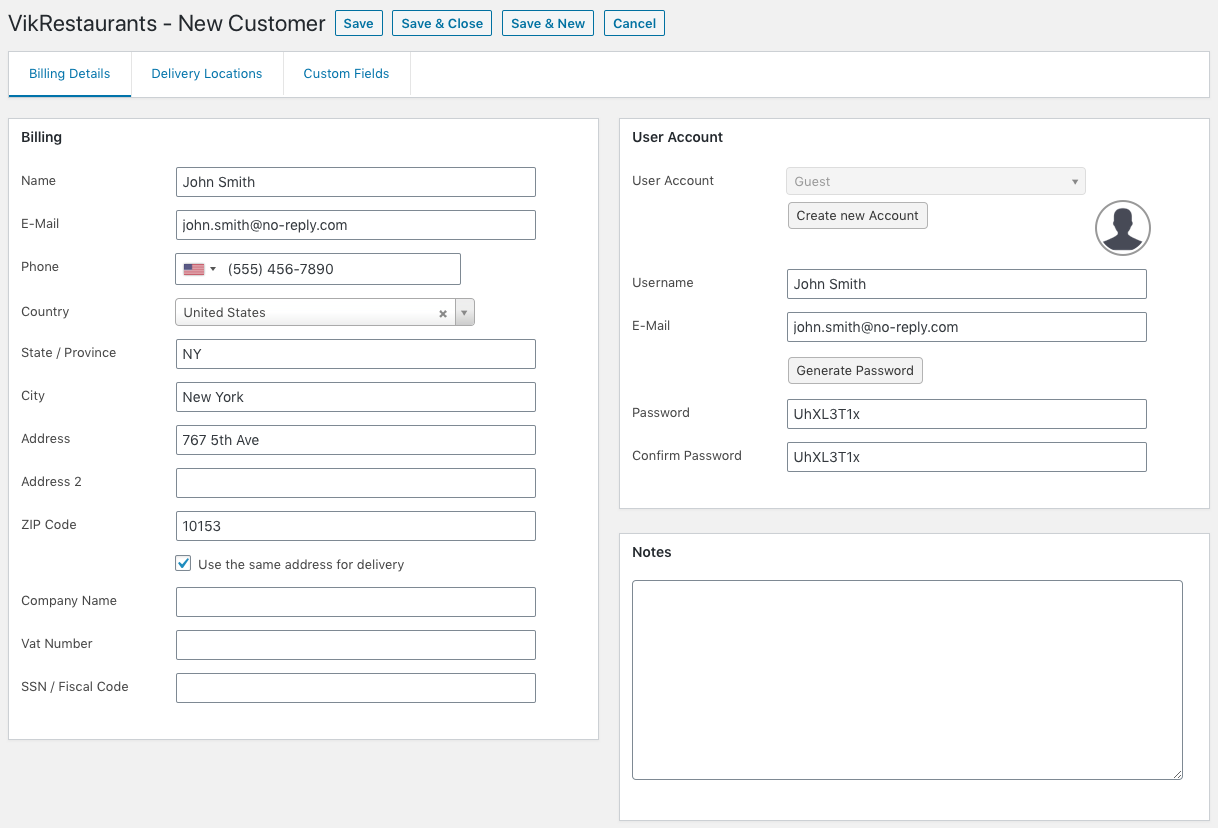
Billing Details
- User Account - the WordPress user assigned to this customer. If the customer doesn't own a WordPress user, you have to select the "Guest" option. By clicking the Create New Account button you will be asked to enter the username, the e-mail and the password in order to register a new WordPress user. The WordPress user will be automatically assigned after saving the customer details.
- Name - the billing full name of the customer.
- E-mail - the billing e-mail address of the customer.
- Phone - the billing phone number of the customer.
- Country - the billing country of the customer.
- State - the billing state/province of the customer.
- City - the billing city of the customer.
- Address - the billing address of the customer. In case the Places API have been properly configured, this field will support the Google Autocompletion feature. After selecting a suggested address, all the related fields will be auto-filled in.
- Address 2 - some optional instructions needed to reach the address.
- ZIP - the billing ZIP code of the customer.
- Company Name - the billing company name of the customer.
- VAT Number - the VAT Number of the customer.
- SSN / Fiscal Code - the social security number / fiscal code of the customer.
- Notes - if you need to insert some additional notes about the customer, you can use this field. This value will be visible only by the administrator.
- Avatar - it is possible to click the image of the profile in order to change the avatar of the customer.
When creating a new customer, under the ZIP code field should be visible a checkbox field. By flagging this checkbox the system will automatically create a new delivery location based on the specified billing details.
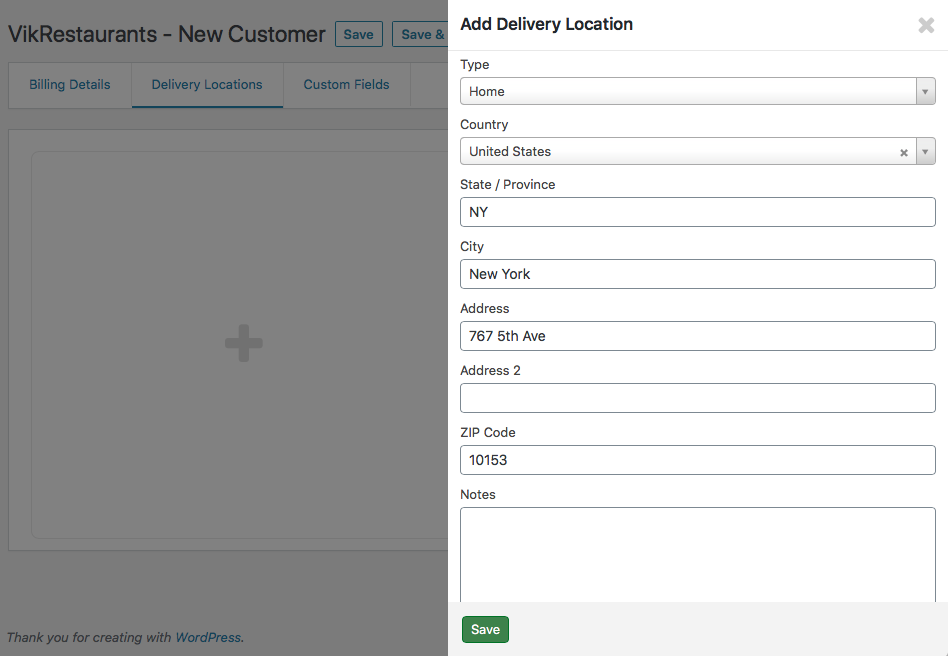
Delivery Locations
The list of the delivery locations of the customer. These addresses can be used to quickly fill-in the address during the purchase of an order from both the front-end and back-end sections.
It is possible to create a new location by clicking the big button. This will open a sidebar from which it will be possible to enter all the following fields.
- Type - an optional type of the delivery location, such as "Home", "Office" or "Other".
- Country - the country of the delivery location.
- State - the state/province of the delivery location.
- City - the city of the delivery location.
- Address - the address of the delivery location. In case the Places API have been properly configured, this field will support the Google Autocompletion feature. After selecting a suggested address, all the related fields will be auto-filled in.
- Address 2 - some optional instructions needed to reach the address.
- ZIP - the ZIP code of the delivery location.
- Notes - some extra notes about the delivery location. This value will be visible only by the administrator.
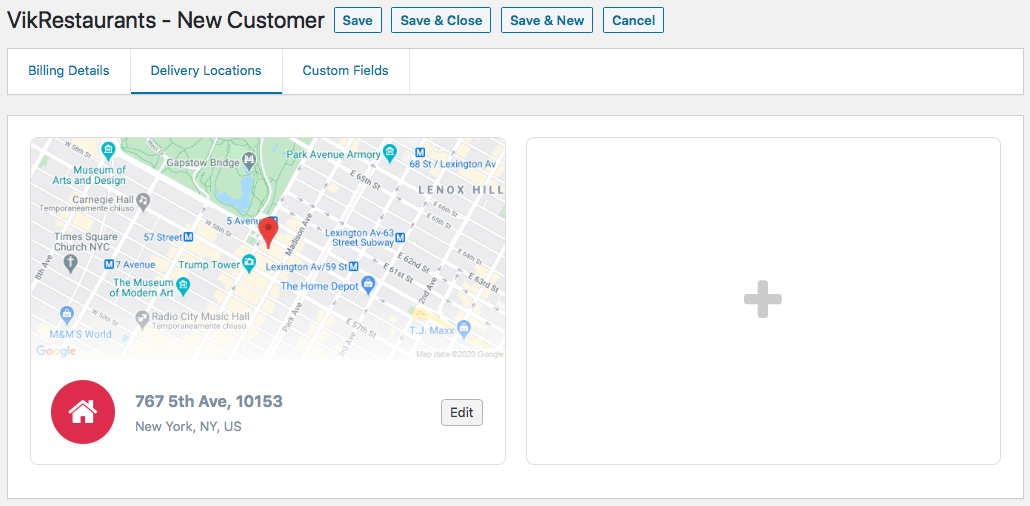
After creating a new location, it will be displayed within the grid. In case the Maps Static API have been properly configured, a preview of the address will be immediately displayed within the grid. Otherwise, a static thumbnail will be used.
It is possible to change the ordering of the addresses by dragging the boxes that contains the locations.
When editing a location, the sidebar will now report also a button to delete it.
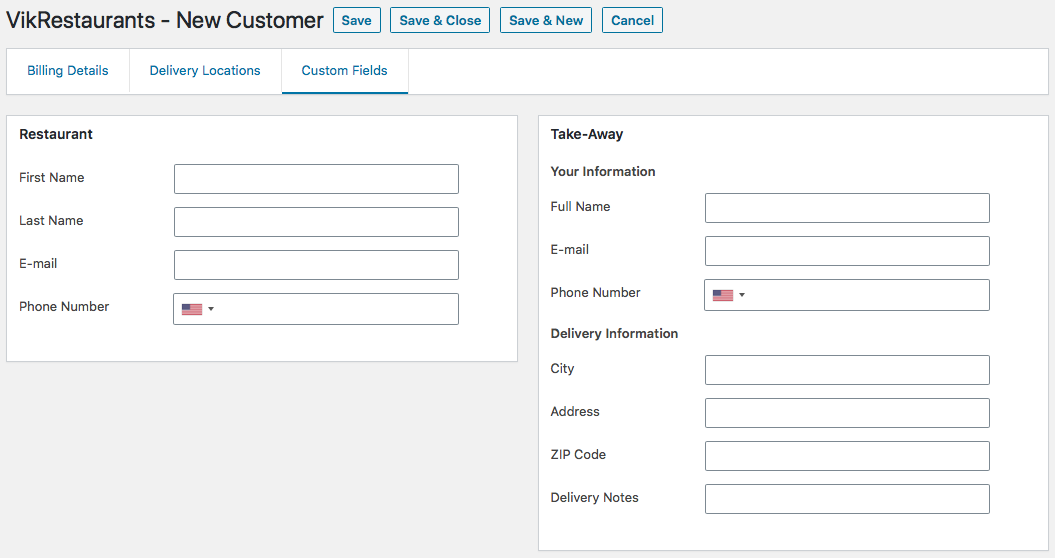
Custom Fields
The custom fields filled-in during the purchase. You can leave these fields empty if you are creating a new customer from the back-end.
SMS Notifications
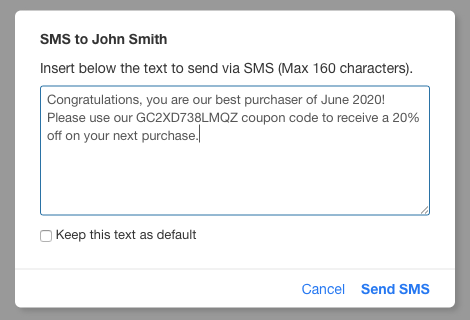
From the customers page you are able to send custom SMS notifications by clicking the button under the Send SMS column.
Only the blue-filled icons allow you to send a SMS. Non-filled icons mean the customer doesn't own a phone number.
From the dialog you are asked to insert a short message (maximum 160 characters) to send to the customer.
By checking the Remember option (keep this text as default), the message will be stored and it will be displayed as default text every time you need to send a new (custom) message.
The Send SMS column won't appear in case the SMS APIs haven't been properly configured.
Reviews
If you want to receive reviews for your products, you have to configure the Reviews section from the global configuration of VikRestaurants first.
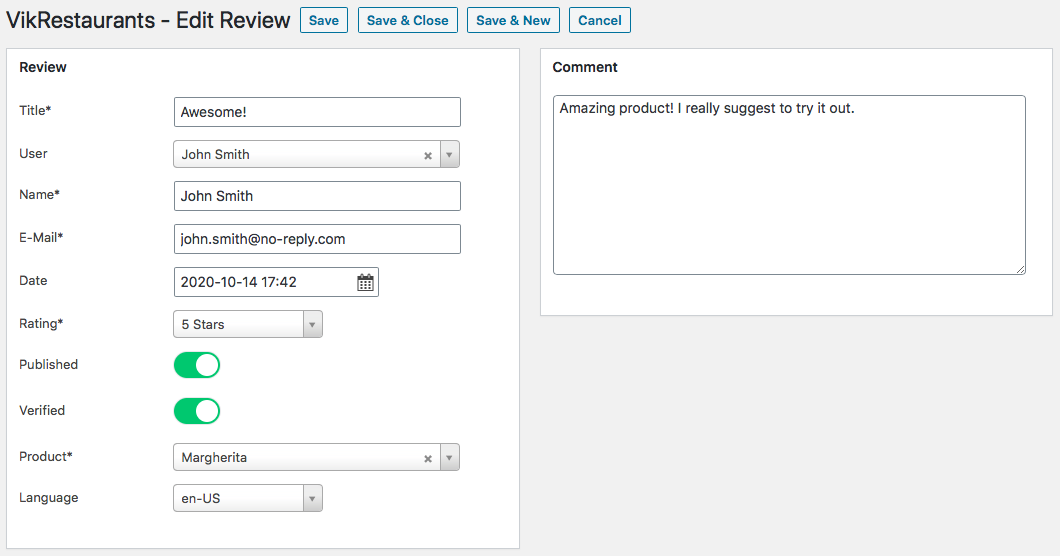
The reviews have a mandatory stars rating (from 1 to 5), a mandatory title and an optional/mandatory description (depending on the configuration of the program).
The reviews are supported only by the take-away products.
The list lets you search the reviews by customer name, review title and reviewed product. In addition, it is possible to filter the reviews with the following fields.
- Status - filter the reviews by status (published or unpublished).
- Type - filter the reviews by reviewer type (verified or unverified).
- Rating - filter the reviews by rating (from 1 to 5 stars).
Here's a list of supported parameters.
- Title - the title of the review (max 128 characters).
- User - the existing WordPress account of the user.
- Name - the name of the user.
- E-mail - the e-mail address of the user.
- Date - the date and time when the customer submitted the review from the front-end. This value can be changed from the back-end.
- Rating - the number of stars to represent the rating of the product (from 1 to 5).
- Published - disable this option if you want to hide this review without deleting it. By default all the new submitted reviews are automatically published, but it is possible to disable this option to publish them only manually.
- Verified - the verified badge means that the customer who left the review actually purchased the product.
- Product - the product rated.
- Language - the language tag of the review. When a customer submits a new review, the language tag will be equals to the language set in the front-end. This option is used to filter the reviews by language.
- Comment - the description of the review. The maximum characters length can be defined from the configuration.
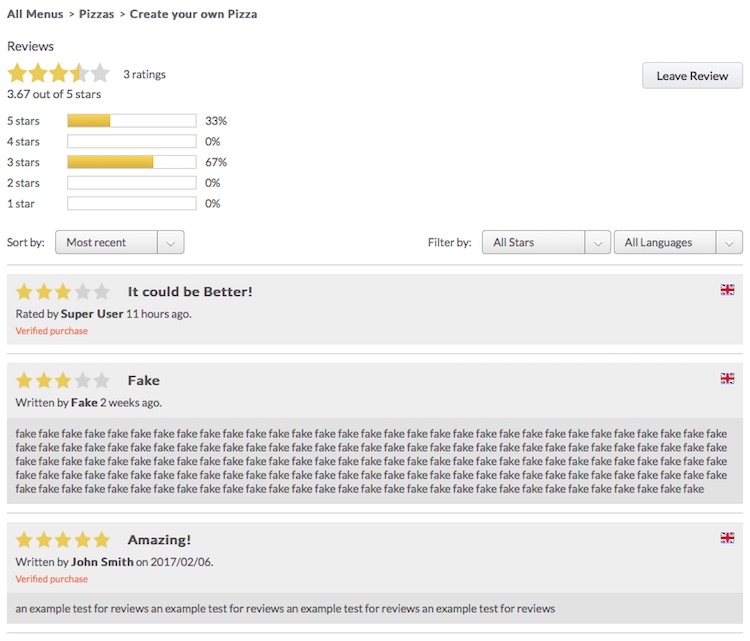
Listing
The reviews are listed in 2 different pages: Take-Away Item Details and Take-Away Item Reviews.
The Item Details page can be accessed by clicking the name of an item from the default Take-Away Menus page. These kind of pages can be also published as new menu items, so that you can have links that point directly to the details page of your items.
The Item Details page shows the latest reviews left that contain a comment. To see all the reviews left for an item, it is needed to click the See All Reviews button to access the Item Reviews page (see screenshot below).
The reviews are also used by the Take-Away Grid widget.
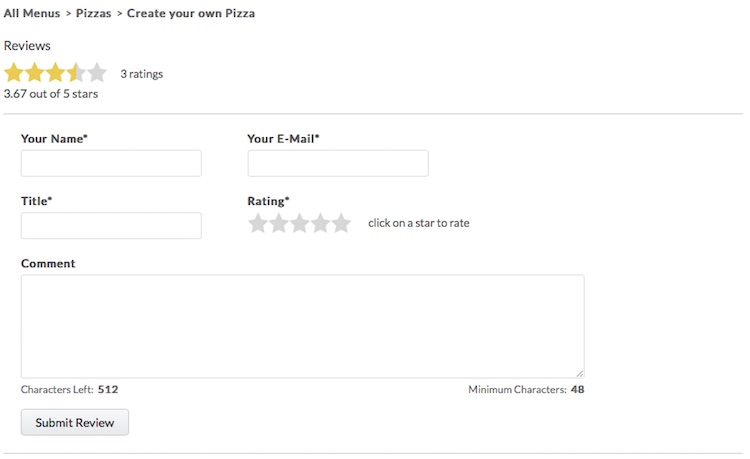
Leave a Review
It is possible to leave a review only from the Item Reviews page by clicking the Leave Review button.
The fields that own the * inside the label are required to leave the review. To choose the rating you have to click the stars box, hover the mouse to the rating you need (1, 2, 3, 4 or 5 star) and click it.
If you seem to be not able to leave a review for an item, make sure you haven't already posted it (for the same item) and try to check the configuration section of the reviews.
Coupons
The coupons system allows you to create discounts that will be applied to the deposit amount for the restaurant reservations or to the total cost of the take-away orders.
Coupons can be used also to save in the reservations a code/reference that could belong to one of the promoters of your restaurant.
The fieldset used to redeem a coupon within the front-end won't appear in case the list of coupon codes is empty.
The list lets you search the coupons by code. In addition, it is possible to filter the coupons with the following fields.
- Group - filter the coupons by group (restaurant or take-away).
- Type - filter the reviews by type (permanent or gift).
Here's a list of supported parameters.
- Group - the group for which the coupon code should be used (restaurant or take-away).
- Code - the code of the coupon that the users will have to enter to redeem it. It can be at most 64 characters long and it can contain any letter, number or symbol. The code should not contain white spaces. When creating a new coupon, the system will generate a random code by default.
- Type - the type of the coupon (permanent or gift). A permanent coupon always applies the discount when it is used. Instead, a gift coupon can be used only once. After that, it will be auto-removed from the system.
- Value - the discount amount to apply, expressed in your currency or in percentage.
- Date Start - the minimum date required to use the coupon.
- Date End - the maximum date required to use the coupon.
- Min. People/Min. Order - the minimum number of people needed to apply the discount (restaurant). The minimum grand total of the orders needed to apply the discount (take-away).
- Total Usages - the total number of times that the coupon code have been already used.
- Max Usages - it is possible to specify here the maximum number of times that this coupon can be redeemed. Applies only to permanent coupon codes.
- Usages per Customer - it is possible to specify here the maximum number of times that the same user can redeem this coupon. In case of restrictions, only registered users are allowed to use the coupon. Applies only to permanent coupon codes.
Invoices
The Invoices page is an archive containing all the invoices that have been generated through the internal system invoicing system.
The navigation on the left-side shows the list of the months that own at least an invoice. While on the center section of the page there is a grid containing all the invoices for the selected month and year. In case there are a lot of invoices, it is needed to press the apposite button(s) to load the remaining ones.
It is possible to search an invoice by:
- order number (e.g. 684)
- order key (e.g. D8ULGI57I6BX839D)
- order number-order key (e.g. 684-D8ULGI57I6BX839D)
- invoice number (e.g. 06)
- invoice suffix (e.g. 2020)
- invoice number/suffix (e.g. 06/2020)
- group (restaurant or take-away)
The invoice filtering is always applied to the selected month and year.
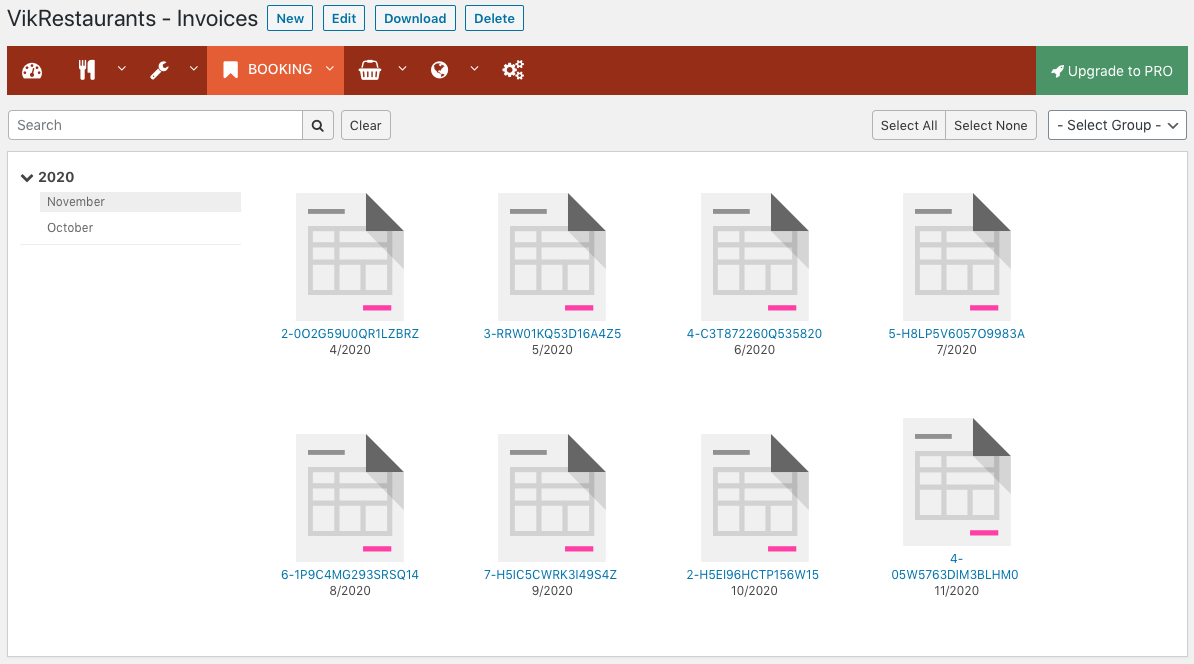
By clicking the invoice name, a PDF will be opened on a different tab of your browser. By clicking the invoice icon, the invoice will be selected. The selected invoices can be deleted or downloaded. In case you need to download a single invoice, it will be downloaded as PDF. While if you need to download multiple invoices, the system will ZIP all them and it will be downloaded as a package.
Invoices Generation
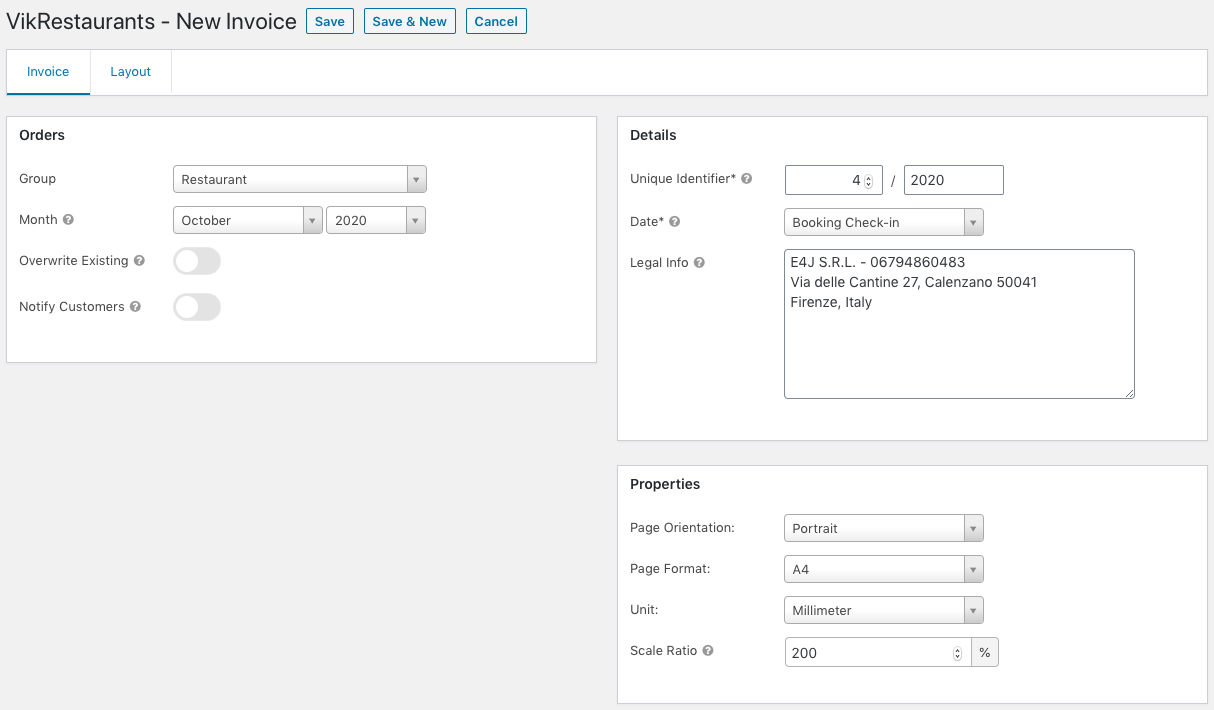
From this page it is possible to generate the invoices monthly or to manually update a single one.
If you need to generate a few invoices only, you can do it directly from the reservations/orders page.
- Group - the group of the invoices to generate (restaurant reservation or take-away orders).
- Month - the month and the year of the reservations/orders to fetch for a mass generation.
- Overwrite Existing - turn on this option to overwrite any existing invoices already generated for the matching order. Leave it unchecked to generate the invoices only for the new orders.
- Notify Customers - enable this option if you want to automatically send the invoices via e-mail to the customers, after the generation.
- Unique Identifier - the invoice number and suffix (e.g. 1/2020, or e.g. 1/SFX). The invoice number MUST be an integer. Every time a new invoice is generated, the invoice number is incremented by one.
- Date - the invoice date, which can be the current day (today) or the date of the checkin (booking checkin). When editing an existing invoice, it will be possible to select a custom date from the related calendar.
- Legal Info - a few lines of text about the legal information of your company.
- Page Orientation - the page orientation of the invoice: Portrait (vertical) or Landscape (horizontal).
- Page Format - the page format of the invoice: A4, A5 or A6.
- Unit - the length unit to use for the invoice: Point or Millimeter.
- Scale ratio - all the images within the invoice will be scaled by the specified percentage amount. The higher the value, the smaller the images. Use 100% to leave the images at their original sizes.
TIP: if you need to restore the invoice number, for example after deleting an invoice, you can follow the steps below:
- open the invoices page;
- click the NEW button;
- select a month in the future which doesn't own any reservations;
- restore the invoice number;
- click the SAVE button.
In this way, none invoice will be generated and the invoice number will be reset.
Invoices Layout
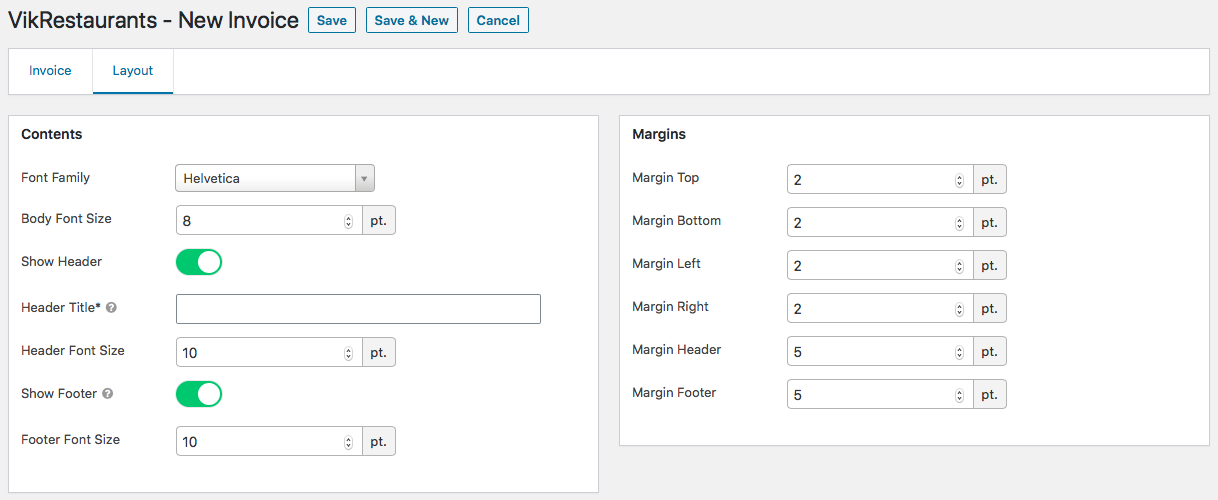
- Font Family - the family of the font that will be used while generating the invoice.
- Body Font Size - the font size used for the contents of the invoice (in points).
- Show Header - enable this option to display the heading of the invoice.
- Header Title - a title to be displayed on the top of the page. In case the text is not visible, it is needed to increase the Margin Top parameter until the title appears.
- Header Font Size - the font size used for the header of the invoice (in points).
- Show Footer - the footer only displays the number of the page (e.g. 1/2). In case the text is not visible, it is needed to increase the Margin Bottom parameter until the footer appears.
- Footer Font Size - the font size used for the footer of the invoice (in points).
- Margin Top - the margin from the top of the page (in points). In case the header is visible, the margin top should include also the height of the heading.
- Margin Bottom - the margin from the bottom of the page (in points). In case the footer is visible, the margin bottom should include also the height of the footer.
- Margin Left - the margin from the left of the page (in points).
- Margin Right - the margin from the left of the page (in points).
- Margin Header - the margin of the header from the top of the page (in points). Available only in case the header is enabled.
- Margin Footer - the margin of the footer from the bottom of the page (in points). Available only in case the footer is enabled.
Template Customization
The templates of the invoices are generated from the following files:
-- RESTAURANT --
/wp-content/plugins/vikrestaurants/site/layouts/templates/invoice/restaurant.php-- TAKEAWAY --
/wp-content/plugins/vikrestaurants/site/layouts/templates/invoice/takeaway.phpIn case you need to customize the template of the invoice, it is possible to create an apposite override for the related layout:
- open the invoice file that you need to edit;
- copy all its contents;
- create a new file under
/wp-content/uploads/vikrestaurants/layouts/site/templates/invoice/[restaurant|takeaway].php; - paste the contents previously copied;
- start editing the override to apply your customizations.