Portal
The Portal section of VikAppointments contains the Countries, the Reviews, the Subscriptions and the Subscription Orders.
Inside the Countries section can be managed also the States and the Cities.
In this section you will be able to configure the portal features of your website, like the reviews for your employees and/or services and the subscriptions purchased by the employees to be listed on your website.
The countries are mainly used to build the locations of the employees and to setup the phone prefixes dropdown near the Phone Number custom field. By clicking the link of a country, it is possible to see all its states.
All the countries of the world are automatically created during the installation of the program.
If your business is located only in one country, you can remove or unpublish all the other countries.
- Name - the name of the country. This value is by default in English.
- Country 2 Code - the 2 letters code of the country. This value have to be a standard of ISO 3166.
- Country 3 Code - the 3 letters code of the country. This value have to be a standard of ISO 3166.
- Phone Prefix - the default phone prefix used on the country.
- Published - disable this option if you don't want to show this country.
- Flag - the image of the flag is automatically assigned using the 2 letters country code. The images of the flags are stored inside the directory: /wp-content/plugins/vikappointments/site/assets/css/flags/
- States - the number of the states inside the country. When this value is empty, the country doesn't own any state.
The states (or provinces) are mainly used to build the locations of the employees. By clicking the link of a state, it is possible to see all its cities.
A lot of states are automatically created during the installation of the program. If your country doesn't have states, you can create them manually.
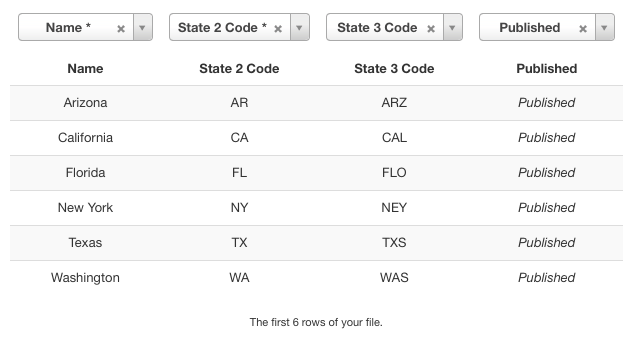
- Name - the name of the state. This value is written by default in the language used by the related country.
- State 2 Code - the 2 letters code of the state.
- State 3 Code - the 3 letters code of the state.
- Published - disable this option if you don't want to show this state.
- Cities - the number of the cities inside the state. When this value is empty, the state doesn't own any city.
It is possible to use the Import button within the toolbar to upload a list of states contained in a CSV file. From this page it is possible to download a sample file to check how the states should be structured.
The CSV file must contain at least the name of the state and the 2 letters code.
Once the CSV file is ready, it is needed to upload it and press the green Import button. From the resulting page it remains to assign the columns of the records to the related values.

The cities are mainly used to build the locations of the employees.
No city is created during the installation of the program.
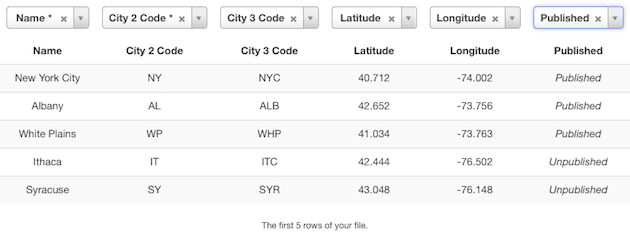
- Name - the name of the city.
- City 2 Code - a 2 letters identifier.
- City 3 Code - a 3 letters identifier.
- Latitude - the latitude of the city (in radiants). This values is used only as reference of the location.
- Longitude - the longitude of the city (in radiants). This values is used only as reference of the location.
- Published - disable this option if you don't want to show this city.
By filling in the latitude and the longitude in the details page, you will see immediately an overview of the position in google maps. By filling in the name of the city, the system will find automatically the respective coordinates (only if the latitude and longitude fields are empty).
Currently, the coordinates of the cities are not yet used by the system. Anyhow, they may by considered to render a map with all the cities and the assigned employees.
It is possible to use the Import button within the toolbar to upload a list of cities contained in a CSV file. From this page it is possible to download a sample file to check how the cities should be structured.
The CSV file must contain at least the name of the city and the 2 letters code.
Once the CSV file is ready, it is needed to upload it and press the green Import button. From the resulting page it remains to assign the columns of the records to the related values.

If you want to receive reviews for your employees and/or services, you have to configure the Reviews section in the global configuration of VikAppointments.
Customers can leave reviews only if all the following conditions are verified:
- the customer is logged-in;
- the customer hasn't rated yet the employee/service;
- the customer has a confirmed appointment with the employee/service to rate;
- the checkin of the appointment is in the past (this confirms the customer effectively met the employee or received the service).
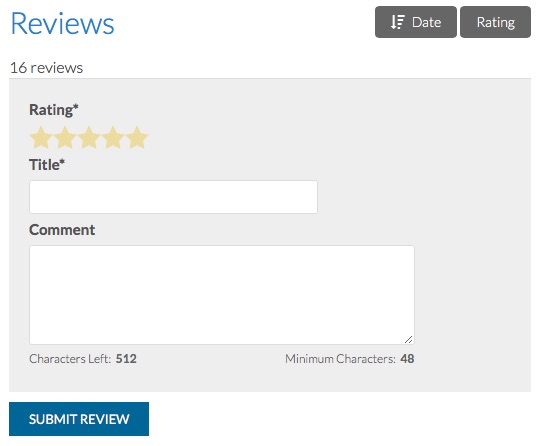
The reviews have a mandatory stars rating (from 1 to 5), a mandatory title and an optional/mandatory description (it depends on the configuration).
It is possible to search the reviews by title, customer name, service and employee. It is also possible to filter the reviews by status (published or not), rating, type and language.
- Title - the title of the review (max 128 characters).
- User - the existing WordPress account of the user.
- Name - the name of the user. This value will be automatically filled-in by selecting the WordPress user.
- E-mail - the e-mail address of the user. This value will be automatically filled-in by selecting the WordPress user.
- Date - when the customer submitted the review from the front-end. This value can be changed from the back-end.
- Rating - the number of stars that represent the rating of the employee/service.
- Published - disable this option if you want to hide this review without deleting it. By default all the new submitted reviews are published automatically, but it is possible to disable this option to publish them manually.
- Employee/Service - the employee or the service rated.
- Language - the language tag of the review. When a customer submits a new review, the lang tag will be the same of the language set in the front-end. This option is used to filter the reviews by language.
- Comment - the description of the review. The maximum characters length can be defined from the configuration.
Here is how the reviews look like in the services details pages and in the employees details pages.

While the customers can submit reviews through the form below.

The subscriptions are located in the Employees Area and can be purchased from the employees to be listed on your website.
The employees will be visible in the Employees List page only when their subscription plan has not yet expired.
You should use the subscriptions only in the case you are hosting a portal of independent employees.
- Name - the name of the subscription plan.
- Amount - an integer value of the subscription. This value is related to the Type option.
- Type - the type of the subscription. The values allowed for the type are the followings: days, weeks, months, years, lifetime.
- Price - the total cost of the subscription plan.
- Published - disable this option if your employees cannot purchase this subscription.
- Trial - enable this option if you want to offer this subscription as a trial for free. Only one subscription can have this option enabled. Employees can purchase a trial subscription only once.
The valid period of a subscription is given by amount per type (like, 6 months or 2 years). Lifetime subscriptions will have always an amount equals to 1 and they will never expire.
The Subscription Orders task in the administrator contains all the orders received from the employees.
It is possible to search the orders by ID (by using the prefix id:), order key, employee name, employee e-mail. It is also possible to filter the orders by status, method of payment, subscription plan and purchase date.
- Order Number - an incremental identifier of the subscription order (integer).
- Order Key - an alphanumeric secret value.
- Date - when the employee purchased the subscription plan.
- Employee - the employee that purchased the subscription plan.
- Subscription - the subscription plan that has been purchased.
- Payment - the payment gateway used to transfer the money to the administrator.
- Total Cost - the total amount of the order. This value is given by the cost of the subscription plan plus the charge of the gateway.
- Total Paid - the total amount paid by the employee.
- Status - the status of the order. There are 3 possible statuses:
CONFIRMED - the order is approved and the employee successfully paid the order. When the subscription plan has no cost, the order will be confirmed automatically.
PENDING - the order is stored in the database and the employee has to pay the amount of the order or have to wait for a manual approval. An order remains as PENDING for an unlimited time.
REMOVED - the order can be removed only by the administrator.
Every time a subscription order is successfully paid or manually confirmed, the expiration date of the employee is automatically renewed.
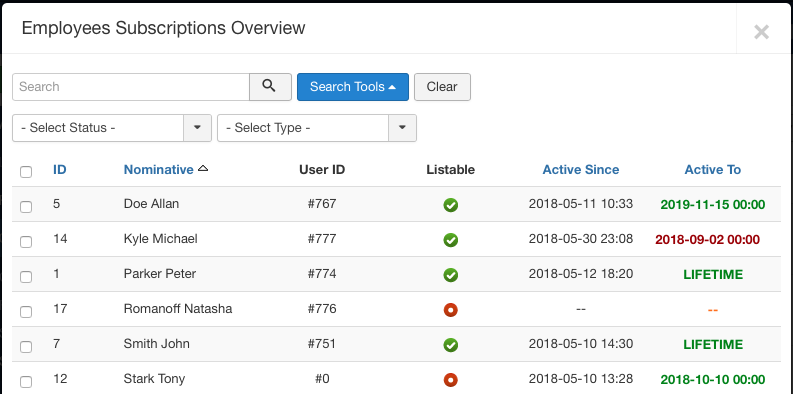
The Employees Overview is used to see a quick list about the listing status of all the employees, so that you can see the active employees and the employees with an expired subscription.
By clicking on the Published/Unpublished icon of each employee, you can change immediately the listable status.
It is possible to search the employees by first name, last name and e-mail. It is also possible to filter the employees by status (listable or not) and type (active, pending, expired or lifetime).
