Your cart is empty!
Appointments
The Appointments section of VikAppointments contains the Reservations, the Waiting List, the Customers, the Coupons and the Calendars.
All the features contained in this section are used to manage the orders and the customers and to check the availability of your employees/services.
Reservations
All the stored orders/appointments are visible from this view. You can also create offline upcoming reservations (e.g. via telephone) with an intuitive calendar form. Every time an order is made from the front-end, the customer, the employee and the administrator(s) will be notified via e-mail.
You can print all the selected orders by clicking the Print button on the toolbar.
It is possible to search the appointments by ID (by using the prefix id:), order key, customer name, customer e-mail, customer phone, coupon code, employee and service. It is also possible to filter the appointments by status, method of payment, type (paid or not) and checkin date.
- Order Number - an incremental identifier of the orders (integer). By hovering the mouse on the ID you will see who (& when) created the order.
- Order Key - an alphanumeric secret value used to search the orders by the customers (order number must be always specified).
- Date - the checkin date of the appointment.
- Time - the checkin time (hours and minutes) of the appointment.
- Employee - the employee that was assigned to the appointment.
- Service - the service that was requested in the appointment.
- People - the number of people for the selected date, time, employee and service. If your service doesn't host multiple people at the same date and time, it will be equals to 1 by default.
- Total Cost - the total cost of the appointment. The value will be automatically filled-in (for new reservations) with the cost of the service. When someone pays the cost of a reservation through a payment gateway, you will be able to see the amount paid near the total cost. The total paid amount cannot be changed manually. If you are using some Special Rates, the information button next to the amount could be used to see how the total cost is calculated (only while creating new reservations).
- Duration - the total duration of the appointment. The value will be automatically filled-in (for new reservations) with the duration of the service, which is used to calculate the checkout time of the appointment. The duration has to be specified in minutes.
- User - select a user from the dropdown to assign a customer to the order and to auto fill-in all the details (nominative, mail and phone number). In case the user doesn't exist or its details are wrong, it is possible to click the icon next to this field to insert/update a customer without having to leave the page.
- Nominative - the full name of the customer for this appointment.
- Purchaser E-Mail - the e-mail address of the customer for this appointment. This value will be used to send e-mail notifications to the customer.
- Purchaser Phone - the phone number of the customer for this appointment. This value will be used to send SMS notifications to the customer. The phone prefix have to be specified from the apposite dropdown and not within the text input.
- Coupon - select a coupon from the dropdown if you want to assign it to the order. If an order has already a coupon code, it won't be possible to change it or to remove it. When you select a coupon code and save the changes, the new amount won't be automatically calculated, while the coupon details will be automatically updated (quantity used). From the dropdown will be visible only the VALID and NOT ACTIVE coupons (expired coupons are ignored).
- Payment Gateway - the gateway used (or to use) to pay the amount of the appointment. If the selected employee won't have custom payments, only the default ones could be selected.
- Status - the status of the appointment. There are 4 different possible statuses:
CONFIRMED - the order is approved and the customer can go to the appointment. The CONFIRMED status is set every time the customers complete a payment successfully or when the total cost of the order is equals to 0.00 and the default status is CONFIRMED (configuration setting).
PENDING - the order is stored in the database and the customer has to pay the amount of the order or has to wait for a manual approval. An order remains as PENDING only for a limited period (the time is given by the Keep App. Locked for configuration setting).
REMOVED - an order becomes REMOVED when a customer doesn't pay the order within the limited range of time.
CANCELLED - an order becomes CANCELLED when a customer cancels it from the Order page in the front-end. It is possible to disable the order cancellation from the configuration. When a customer cancels its order, it won't be refunded automatically by the system. In case the User Credit setting is enabled, the total amount paid will be accredited to the user account.
When you change the status to CONFIRMED, the Notify Customer parameter will be automatically checked to notify the user via e-mail. When you select the CANCELLED option, you will be asked to notify all the customers in the waiting list of that service and for that date. - Already Paid - enable this option if your customer has already paid the amount of the reservation. This value will be auto checked when the payment is made online. This value should be used only for offline payments, cash upon arrival or failed transactions.
- Notify Customer - check this option if you want to re-send a notification e-mail about the appointment only to the customer. The button next to this option, that appears when turning it on, can be used to include custom texts within the notification e-mail. When writing a text, it will be saved as new (unpublished) E-mail Custom Text so that it can be re-used in a second time.
- Notify Employee - check this option if you want to re-send a notification e-mail about the appointment only to the employee.
- Custom Fields - the custom fields filled-in from the customer during the purchase. If you leave these fields blank, they will be auto filled-in with the customer details (only e-mail and phone number).
- Additional Options - the additional options for this reservation. By selecting an option from the dropdown, the system will be display the price and the quantity to choose. If the option has variations, you will be asked also to fill in the variation needed. You have to press the Add Option button to insert the selected option to this reservation.
- Notes - if you need to insert some additional notes about the order, you can use this field. This value will be visible only from the administrator.
When a new reservation is created from the back-end and it is assigned to a specific user that owns a package, the system will automatically try to redeem it. The same doesn't happen while editing an existing reservation.
When a new reservation is cancelled from the back-end and it was used for a package, the system will automatically try to restore the package for being used in a second time.
Single & Multiple Appointments
If your system allows the creation of orders with multiple appointments (Enable Cart configuration setting), next to the ID cell of each reservation you can see a package icon or a chain icon.
The package icon represents the single orders (one order with one service).
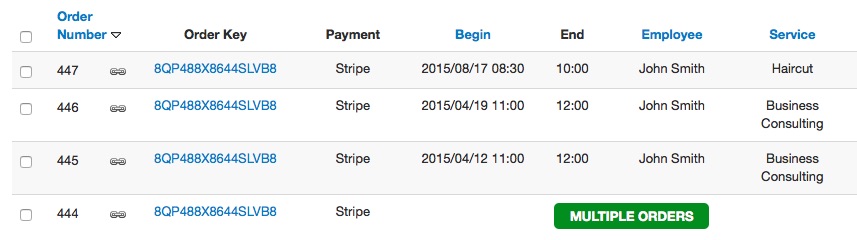
By clicking the Multiple Orders button you will open the details of the order containing all the assigned appointments. The records that display the Multiple Orders button are called PARENTS (one order with more than one service). When you change the status from a PARENT, also the status of all the children appointments will be changed. In order to change the total cost of a PARENT you have just to click its Total Cost.

Multiple Appointments has the chain icon next to the ID (after clicking the green button) and share the same Order Key.
If you don't click the green button, only the parent order will be displayed.
After visiting the details of a PARENT order, it is possible to click the Back button to return to the appointments' list.
Order Statuses
Within the management page of a reservation, it is possible to access the Order Statuses section to check an history of the order. From this list it is possible to read a description of each status that the order received. For example, it is possible to check how the order was CONFIRMED. Or maybe why the appointment was marked as REMOVED after a PENDING status.
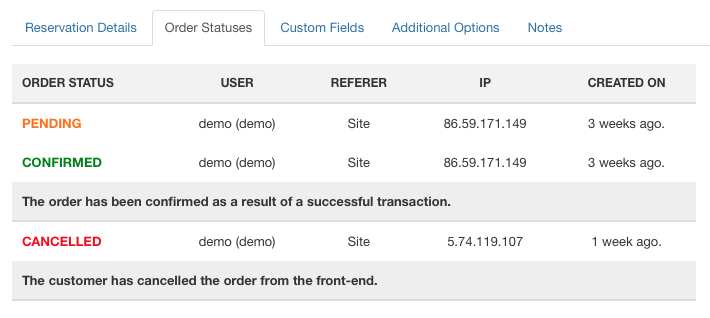
It is also possible to change the status manually and to add a custom comment as reminder.

Make Recurrence
You can create a recurrence for an order by selecting it and clicking the Make Recurrence button on the toolbar.
It is possible to create a recurrence only for a reservation per time. It is not possible to create a recurrence for PARENT orders.
Before to create the recurrence you are asked to specify the time arguments:
Repeat Every [Day, Week or Month] For the Next [Amount][Days, Weeks or Months].

You can get a preview of the available and occupied dates by clicking the Get Recurrence Preview button, which will load immediately a list with the calculated dates and their statuses. A reservation results as not available when there is already a stored appointment for that date and time or if that date and time are not contained in the working days of the employee/service.
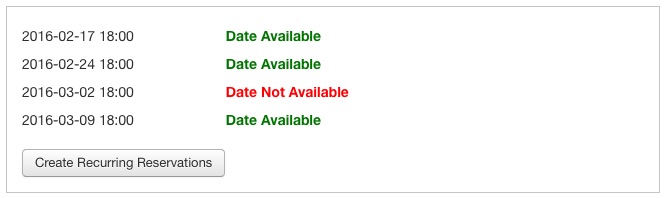
The reservations will be stored only after clicking the Create Recurring Reservations button, which will display the number of created reservations. Notice that it will be created a reservation only for the available dates, while the occupied dates won't be considered.

Export
The reservations can be exported by clicking the Export button on the toolbar.
By default there are 2 different ways to export the reservations: ICS and CSV.
The reservations to export can be filtered only by date and/or employee.
The dates filters will be automatically filled-in with the oldest checkin (start date) and with the furthest checkin (end date) to cover all the CONFIRMED reservations you have on your system.
ICS: the reservations will be exported in a file following the standard structure of the iCalendar format.
The exported file is compatible with all the most important calendar handlers (iCal, Google Calendar, Outlook Calendar and so on), so that you can import it to synchronize your calendar with the appointments manually.
CSV: the reservations will be exported in a file following the standard structure of the comma-separated values format.
The exported file is compatible with all the most important spreadsheet applications (Open Office, Excel and so on).
SMS Notifications
If you have configured the SMS APIs in the configuration of the program, you will see a Send SMS button on the toolbar.
The SMS message should contain a short description or a reminder about the appointment.This text can be specified from the SMS APIs configuration page.
To send a SMS you have to select at least a reservation and press the Send SMS button. The system will try to send a SMS to the phone number of each selected reservation. You will see a response about the status of the messages (success or failure).
Invoices
Pick one or more reservations from the list and press the Invoice button on the toolbar to generate the related invoices.
The generated invoices will be placed under the Invoice column of the list. By clicking the invoice image, the system will open the .pdf on a different tab of your browser. You can also see and download all the generated invoices from the Archive view.
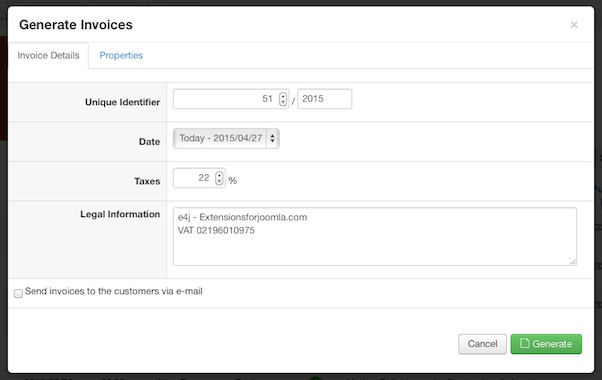
- Unique Identifier - this is the unique code to identify the invoice. It consists of 2 different values: the first have to be a unique incremental integer number and the second can be a text or a number (like a code or a year). Each time you generate an invoice the unique number is incremented automatically. You should change this value only in case you are going to overwrite an existing invoice.
- Date - the date of the invoice can be equals to the creation day (current day) or to the booking day (when the customer booked its order).
- Taxes - the amount of the taxes used in your country (in percentage: 22% or 20.63%). The taxes in VikAppointments are always included in the total cost of the orders, so the invoice will separate the taxes from the total amount.
- Legal Information - a short description about the legal information of your company.
- Send Invoices - if you check this option, each customer will receive automatically the generated invoice via e-mail.
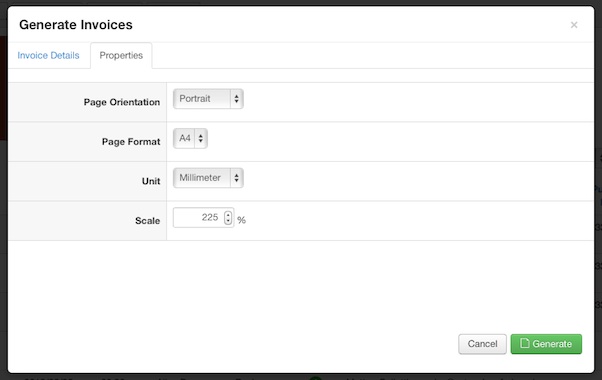
- Page Orientation - the orientation of the page can be Landscape (horizontal) or Portrait (vertical).
- Page Format - the format of the page can be A4, A5 or A6.
- Unit - the unit length of the page can be specified in Points, Millimeters, Centimeters or Inches.
Due to backward compatibilities, this value should be always set to millimeters. - Scale - this option have to be specified in percentage and it is the scale ratio of the images. Don't leave it empty.
Closures
It is possible to use the Closures feature in order to stop receiving appointments for one or more employees on a range of time for a certain date.
The form used to block the appointments can be accessed by clicking the Block button on the toolbar.
- Employees - all the employees that should be blocked (at least one).
- Day - the date for which the employees should be blocked.
- From - the initial time of the closure (hours and minutes).
- To - the ending time of the closure (hours and minutes).
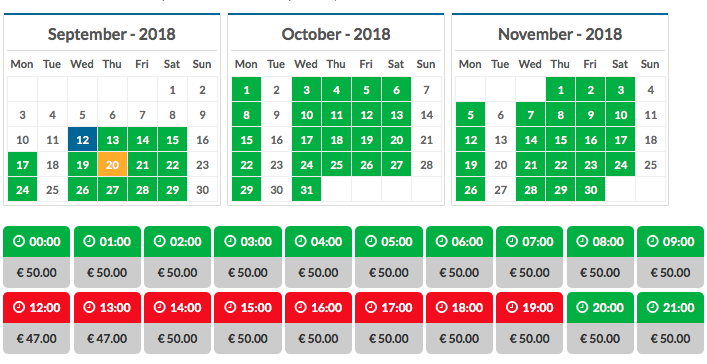
Every time you create a new closure, the system will display a closure record within the appointments' list.

Following the example in the previous image, John Brown won't be bookable on 2018-09-12 from 12:00 (included) to 20:00 (excluded).
Here's the result of this closure.
In order to remove a closure, you have just to delete the record from the list.
Waiting List
The Waiting List is an automated system to notify the customers that are waiting for a service in a specified date. In fact, every time a customer or the administrator cancel an order, the system will automatically send a notification via e-mail (and via SMS if a gateway is configured) to all the customers interested in that service for that date.
The customers can register themselves in a Waiting List from the details page of a service and from the details page of an employee by clicking the Add Me in Waiting List button. This button will be displayed only if the selected date contains at least a booked time.
When a row in the Waiting List becomes expired (the checkin day is in the past), it will be removed automatically from the system.
- Service - the service in which the customer is interested. This field is mandatory.
- Employee - the employee in which the customer is interested. This field is optional. When the employee is not specified, the customer will be notified for any cancellation related to the selected service.
- Checkin Day - the checkin day in which the customer is interested. This field is mandatory.
- User - the customer to assign in the waiting list. By specifying a user, the e-mail and the phone number will be automatically filled in (only if they are empty).
- E-Mail - the e-mail address of the customer, used as recipient for the notification. This field is mandatory.
- Phone Number - the phone number of the customer, used as destination for the notification via SMS. The phone number must contain the phone prefix before the address, by specifying the plus symbol and the prefix (+1). If the phone number is not specified or the SMS API gateway is not configured, the SMS won't be sent.
Customers
The customers view is used to collect all the details of your clients.
A customer will be created automatically every time a new logged-in client places a new order from the front-end.
Your users can edit their details by themselves from the All Orders view in the front-end, by clicking the My Profile button.
All the details contained in the Customer object are used to generate the invoices of the orders.
From the back-end, you can see the number of CONFIRMED appointments made by your customers and you can also sort them to see a best-purchaser ranking.
- User Account - the WordPress user assigned to this customer. If the customer doesn't have a WordPress user, you have to select the Guest option. By selecting the Create New Account option you will be asked to enter username, e-mail and password to create a new WordPress user. The user will be assigned automatically after saving.
- Name - the billing full name of the customer.
- E-mail - the billing e-mail address of the customer.
- Phone - the billing phone number of the customer. The phone prefix (like +1) must not be specified when country is selected.
- Country - the billing country of the customer.
- State/Province - the billing state/province of the customer.
- City - the billing city of the customer.
- Address - the billing address of the customer.
- Address 2 - a secondary optional billing address of the customer.
- Zip - the billing zip code of the customer.
- Company Name - the billing company name of the customer.
- Vat Number - the VAT Number of the customer.
- SSN / Fiscal Code - the social security number / fiscal code of the customer.
- Credit - the remaining user credit of a customer. This field is visible only in case the Enable User Credit setting is enabled.
- Custom Fields - the custom fields filled-in during the purchase. You can leave these fields empty if you are creating a new customer from the back-end.
- Notes - if you need to insert some additional notes about the customer, you can use this field. This value will be visible only from the administrator.
- Avatar - the image of the customer can be changed only by the customers within the front-end.
User Credit
The user credit is an amount that the customers can use to book the services without paying their costs. In case the cancellation is enabled, every time a customer cancels an appointment, an amount equals to the price of that appointment will be automatically added into its credit. So that it will be able to book a different appointment without paying anything else.
In order to use the user credit feature, the Enable User Credit setting within the Shop configuration must be turned on.
For example, if a customer has a credit equals to 40 €, we can face all these possibilities:
- it books an appointment that costs more than 40 €
- it books an appointment that costs 40 €
- it books an appointment that costs less than 40 €
In the first case, the user credit will be used to pay only a part of the total cost. Then, the remaining part will have to be paid again. In the second case, the user credit will be used to pay the whole total cost and the appointments will be automatically confirmed. In the third case, only a part of the user credit will be used to pay the whole total cost.
Import
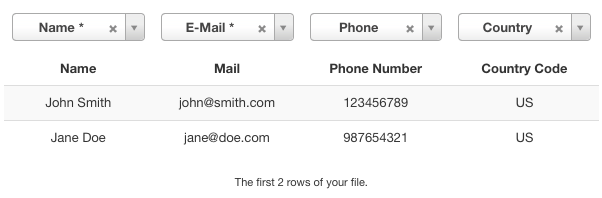
It is possible to use the Import button within the toolbar to upload a list of customers contained in a CSV file. From this page it is possible to download a sample file to check how the customers should be structured.
The CSV file must contain at least the name of the e-mail of the customer.
Once the CSV file is ready, it is needed to upload it and press the green Import button. From the resulting page it remains to assign the columns of the records to the related values.
Export
It is possible to use the Export button within the toolbar to download all the customers stored in the system. After clicking that button, the system will show the first 10 records (and how they look) that will be exported. In order to export all the records, it is needed to click the Download button.
Before downloading the records you will be asked to select the format of the file. The system is able to export the records in SQL and CSV formats.
SMS Notifications
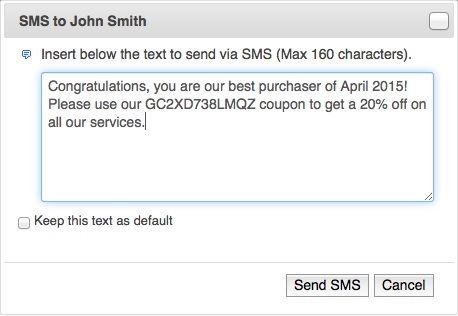
From the customers page you are able to send custom SMS notifications by clicking on the link under the Send SMS column.
Only the blue icons allow you to send a SMS. A Gray icon means that the customer doesn't own a phone number.
Within the popup you are asked to insert a short message (maximum 160 characters) that will be sent to the customer.
If you check the Remember option (keep this text as default), the message will be stored and will be displayed by default every time you want to send a message.
Coupons
The coupons are used to offer discounts to the customers during the purchase.
Coupons have to be applied before to save the order, within the confirmation page, and it is not possible to apply multiple coupons at the same time. If you try to enter 2 valid coupons, only the last one will be used.
There is no way to display coupons in the front-end, so you should promote them by yourself (e.g. through articles, modules, newsletters and so on).
- Code - the coupon code to use to be applied. When you create a new coupon, a random code will be generated automatically. If you want you can change it to make it more human-readable.
- Type - choose the type between Permanent option and Gift option. Permanent coupons remain on your system and can be used multiple times. Gift coupons can be used only for the specified quantity amount, then they will be automatically marked as expired (or, eventually, removed).
- Max Quantity - the max quantity of usages for this coupon. This value is considered only for Gift coupons.
- Quantity Used - the number of times that this coupon has been used.
- Auto Remove When Used - when this option is enabled and the Quantity Used parameter reaches the Maximum Quantity, this coupon will be automatically removed from the system. Even if this option is disabled and the coupon is still active in your system, it won't be available. This option is considered only for Gift coupons.
- Percent or Total - choose if the value of the coupon is a total amount (like 20.00 €) or a percentage amount to discount on the total order (like, 220.00 € - 15%).
- Value - the amount of the coupon to discount.
- Minimum Cost - this restriction is used to apply the coupon only when the Total Cost of the order is equals or higher than this amount.
- Date Start - this restriction is used to apply the coupon only when the booking date is equals or higher than this option. Leave it empty if you don't want to use this restriction. This restriction can be applied only if you specify also the Date End restriction.
- Date End - this restriction is used to apply the coupon only when the booking date is equals or lower than this option. Leave it empty if you don't want to use this restriction. This restriction can be applied only if you specify also the Date Start restriction.
- Last Minute - enable this option if your coupon is "Last Minute". When you enable this option you will be asked to enter the "Checkin Within" value to determinate the maximum available date and time (by default 24 hours). In this way you can use the coupon only whether the checkin of the appointment is not after 24 hours from the current time.
- Notes - a short description for this coupon, which can be seen only by the administrator.
- Available Services - restrict the usages of this coupon only to the specified services. If no service is specified, it will result available for all the services in your system.
- Available Employees - restrict the usages of this coupon only to the specified employees. If no employee is specified, it will result available for all the employees in your system.
- Status - the status of a coupon is defined automatically evaluating the dates restrictions. The available statuses are:
- Valid, the coupon code can be used by the customers. The current date is between the dates restrictions or the restrictions are not specified and the quantity used is lower than the maximum quantity.
- Not Active, the coupon code cannot be used by the customers. The current date is lower than the Date Start restriction.
- Expired, the coupon code cannot be used by the customers. The current date is higher than the Date End restriction or the quantity used is equals than the maximum quantity.
In case the Publishing Mode is set to Current Date, the coupon code will be redeemed only whether the current date (at booking time) is between the specified dates. Otherwise, it will be applied only whether all the selected checkins are between the specified dates.
Groups
It is possible to create some groups in order to categorize all your coupons. In this way, it will be easier to search them. These groups may result helpful when the system owns a huge number of coupons.
The groups can be visited by clicking the Manage Groups button, located within the top-right side of the coupons page.
- Name - the name of the group.
- Description - a short description of the group.
Import
It is possible to use the Import button within the toolbar to upload a list of coupons contained in a CSV file. From this page it is possible to download a sample file to check how the coupons should be structured.
The CSV file must contain at least the coupon code.
Once the CSV file is ready, it is needed to upload it and press the green Import button. From the resulting page it remains to assign the columns of the records to the related values.
Export
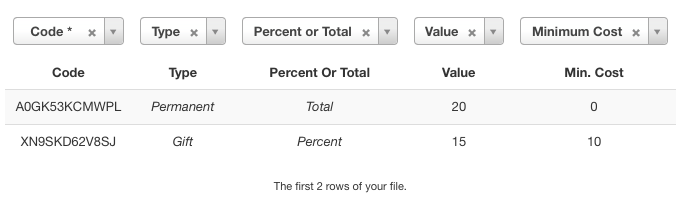
It is possible to use the Export button within the toolbar to download all the coupons stored in the system. After clicking that button, the system will show the first 10 records (and how they look) that will be exported. In order to export all the records, it is needed to click the Download button.
Before downloading the records you will be asked to select the format of the file. The system is able to export the records in SQL and CSV formats.
Calendar
From this page you can see the availability calendar overview of all your employees. The availability calendar is referred to only one employee per time. To change employee you have to switch value from the dropdown.
Below each month you will see a quick report about the earning of the selected employee. If you are not able to see these reports you should click the Show Statistics button.
Every month displays the total earning and the total number of appointments, the total earning of the selected employee and the total number of appointments of the selected employee. Then there are these last reports divided per services.
If you want to see a quick list of the reservations in a certain day, it is possible to pick a date from the calendar to display a list on the bottom of the page. It is possible to see all the details of a reservations by clicking the link. If the list doesn't appear, there are no reservations on the selected date.
Daily View
By clicking the Switch to Daily View, the system will use a different layout to display the calendar. In fact, it will be displayed a table containing the appointments of the next 7 days.
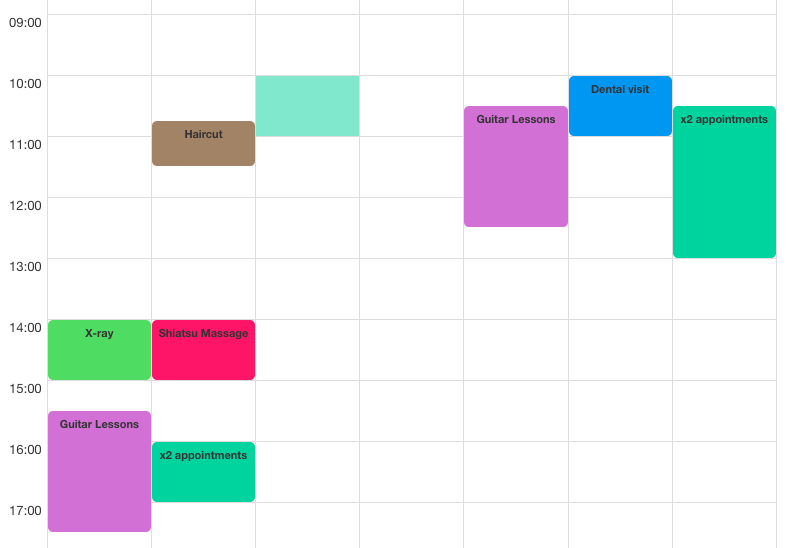
By clicking any appointment, the system will display the related details. In case of clustered appointments (appointments at the same date and time), the popup will contain the details of each appointment.
By clicking an empty cell, the system will show a table with the appointments only for the selected date. The only difference is that here the columns are represented by the employees (instead than the day). From this page, after clicking an empty cell again, the system will let you create a new reservation.
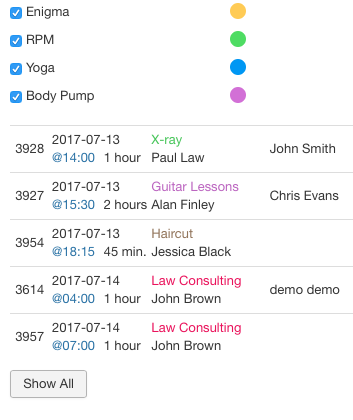
On the right side it is possible to see the list of services and all the appointments for the current range of dates. Next to the services it is possible to click the colored circle in order to change the background of the related appointments. Instead, within the list of appointments, it is possible to click the time in order to highlight the related appointment.
Reports
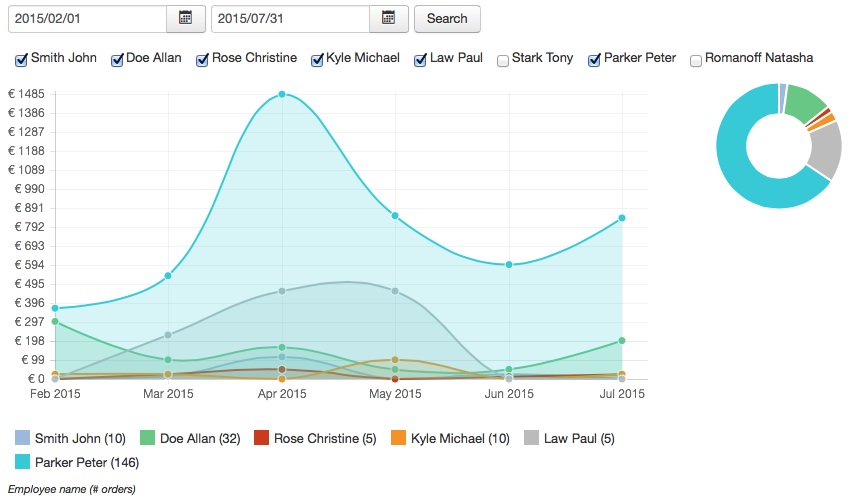
The reports page displays the main statistics of all the employees: total earning and monthly earning.
The total earning is a cake graph which displays all the money earned by each employee for all the services.
The monthly earning is a line graph which displays all the money earned by each employee for each month. From the legend you can see the name of each employee and the total number of CONFIRMED reservations received in the specified dates (number between parenthesis).
The reports can be filtered by 2 range dates (with a maximum distance of 3 years) and by employees.
The "See Services Reports" button on the right side can be used to count the records by considering the selected services instead of the selected employees.