Your cart is empty!
Theme Adventures Documentation
(based on Vik Rent Car plugin)
Installation
Theme installation
Once you purchase the “Adventures” theme, you will get a “.zip” package. By accessing the control panel of your WordPress site, you will be able to install the “Adventures” theme by directly uploading the .zip file to the WordPress Upload Theme dashboard. When it is properly installed, you will need to activate it to move on to the next step.
Install the Sample Data
In order to have the theme as our demo website, you can install the Sample Data in a very easy way by following these steps:
- Go on Appearance > Customize.
- Install and Activate to the VikWidgetLoader plugin suggested in the Cutomizer area.
- Once installed the plugin, return on the Appearance > Customize and click on Install our Sample Data.
Widgets
Recommended Plugins
VikWidgetsLoader
IMPORTANT: Before to start using the theme, you need to install and activate the VikWidgetsLoader plugin.
This plugin contains all our widgets that you can use with our themes. Please, click here to install the plugin, otherwise you can find a download link in the Theme Customizer.
Here the list of the VikWidgetsLoader widgets used in our theme:
- VikWP Grid Content
- VikWP Text Slide
- VikWP Counters
- VikWP Google Maps
- VikWP Icons
- VikWP Speakers
Vik Rent Car Widgets
Because the theme has been made for our Vik Rent Car plugin, some of the widgets used on this theme are related to this plugin and they will be installed and activated with it.
Here the list of the Vik Rent Car widgets used on this theme:
- VikRentCar Currency Converter
- VikRentCar Search Form
- VikRentCar Cars
Logo Setup
With this theme you can add your logo from the Setting panel of the theme Customizer. Because you could have a different header from the homepage, on this theme you could setup two logos, one for the homepage and one for the internal pages (this is optional).
To setup the logo, please follow those steps:
- From the Dashboard go to Appearance > Customize > Settings (remember to activate our theme).
- Click on Logo Settings.
- On this area you can upload the homepage and the Internal logo. If the Internal logo is empty, will be automatically loaded the Homepage logo also in the Internal pages.
- Click on Publish to save your settings.
![]()
Homepage Setup
This theme provides you the option to create a static Front Page by using a single page or a Fronte Page with a blog posts layout.
In our demo website you use the static Front Page.
Static Front Page
To display a static front page follow these steps:
Create a home page
- Go to your WordPress Dashboard > Pages > Add New.
- Enter the title page.
- Enter the text for the page in content area.
- Select Home Page as a page template from Template drop-down option in the Page Attributes column Area.
- Click on Publish/Update button.
On our demo website, from the Customize > Settings > Layout Settings, we have disabled the Homepage title. You could read more about this section on this chapter. In our demo website we hide the content and title of the home page, the most important thing here is the Page Template (point 3).

To set up static page as Front Page
- From your WordPress Dashboard go to Settings > Reading.
- In the Front page displays set the option to A static page.
- Select the page created previously from the Homepage dropdown.
- Click on Save Changes to apply your setup.

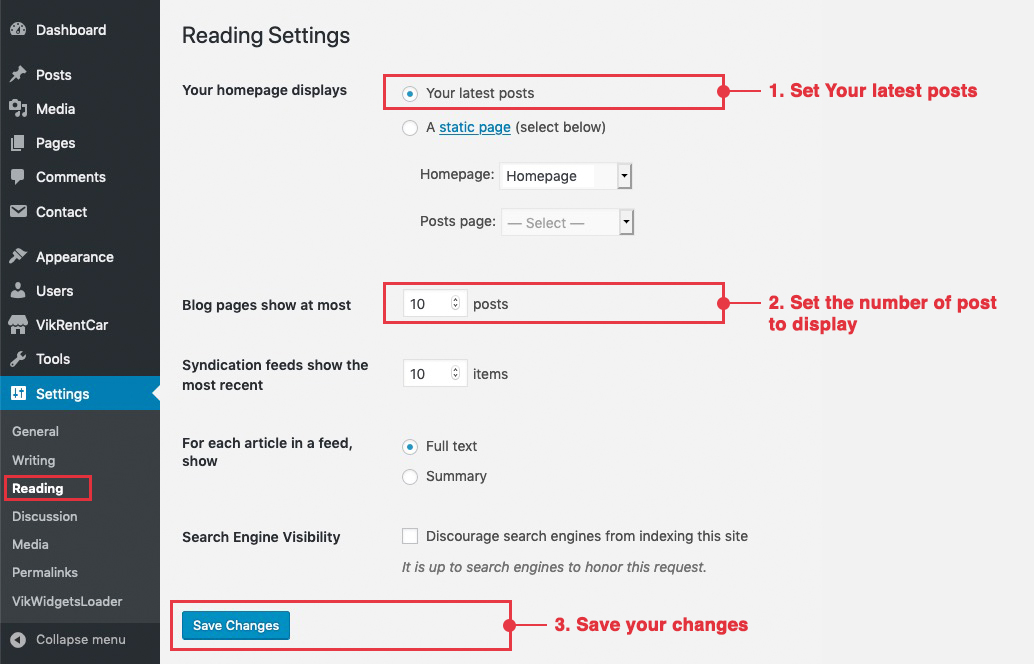
Blog Front Page
To display instead a list of Posts for your Front Page, follow those steps:
- From your WordPress Dashboard go to Settings > Reading.
- In the Front page displays set the option to Your latest posts.
- From the set the number of post you'd like to show in your Front Page.
- Click on Save Changes to apply your setup.
Header Setup
Static Image Settings
To pick what is shown in the Header of the theme, you need to use the 'Customizer' view.
In it, you will find a section called 'Header Settings', which allows you to pick whether you prefer using a static image or a sequence of sliding images in your header. It also contains the settings for the header image.
- From the WordPress Dashboard > Appearance > Customize > Header Settings
First of all, if you prefer using a Static image as the header of your website, you will need to head in the 'Header Options' subsection.
- From the WordPress Dashboard > Appearance > Customize > Header Settings > Header Options > Static Image
The 'Header Type' field will allow you to select which type of header you wish to display. This should be set to 'Static Image'. You will find a link under it which will redirect you to the 'Static Image Options' subsection.

Make sure you publish the changes before you click on it, as you will be redirected, and the current changes will be lost. If you click on it, you should be able to see three fields:
- Title - The title to be displayed over the static background image
- Image Caption - The caption to be displayed over the static background image
- Header Image Arrangement - "Cover" sets the cover image to slide along with your website, when your website is scrolled, "Fixed" leaves it static in place.
As for setting the actual image to be displayed, you should head into the subsection 'Header Image'. From it you will be able to upload a new header, or you will be able to pick from previously uploaded headers or from suggested images already present on your site.
You’ll also be able to crop your image once you upload it for a perfect fit.
Slider Settings
Using the slider
If you prefer using a slider of images as the header of your website, you will need to head in the 'Header Options' subsection. The 'Header Type' field will allow you to select which type of header you wish to display. This should be set to 'Slider'. You will find a link under it which will redirect you to the 'Header Slider Settings' subsection.

In the 'Header Slider Settings' subsection, you will be able to set each individual image (from 1 to 5), including their settings, or you can modify the whole slider's settings from the 'Slider Settings' section. In the 'Slider Settings' section you can set the following parameters of the slider:
- - Set how high should the slider be if it's not fullscreen.
- Text Font - Choose the text font used for each image's title and description.
- Title/Caption/Read More Effect - The animation effect for the title/caption/read more transition.
- Text Align - The alignment of the Title,Caption and Read More text.
- Enable Navigation - If enabled, displays the navigation arrows on the sides of the slider.
- Enable Navigation Dots - If enabled, displays the navigation dots on the bottom of the slider.
You can also set some parameters for each image individually. You can do so from each 'Slider Image' subsection. The parameters available are the following:
- Slider Image - The image to be displayed in the slider.
- Title - The title to be placed over the image when it appears.
- Description - The description to be placed over the image when it appears.
- Read More - The text placed inside the button that appears over the image.
- Read More Link - The link the button placed over the image redirects to.
Widgets
Our live demo contains some widgets which recommend you use on your website. Here are more informations on how to install them and set them up.
VikWidgetsLoader
This is a plugin available on the WordPress Repository, which adds several new widgets on to your website, some of which are used by this Theme.
To download VikWidgetLoader click here.
VikWP Icons
The Icons widget is used to display several icons, optionally with individual links and text. It can be used to represent different functionalities, or as links for your social accounts.
![]()
The widget is very flexible, it allows you to select icons from a big icon library, you can take a look to the icons available from the official FontAwesome website.
Click here to read our Knowledge Base post that explains the VikWP Icons widget in more details.
Here the list of the sidebar where this widget has been used on our Adventures demo website.
Sidebar Name: Top Bar - Left
Sidebar Name: Extra Services Section
Sidebar Name: UpFooter
Sidebar Name: Contact Us - Under content (Contact us page)
VikWP Text Slide
The VikWP Text Slide widget displays a slider which shows text from a post category. The text fades in and out on regular intervals or could have a carousel layout. The widget could have a background image.
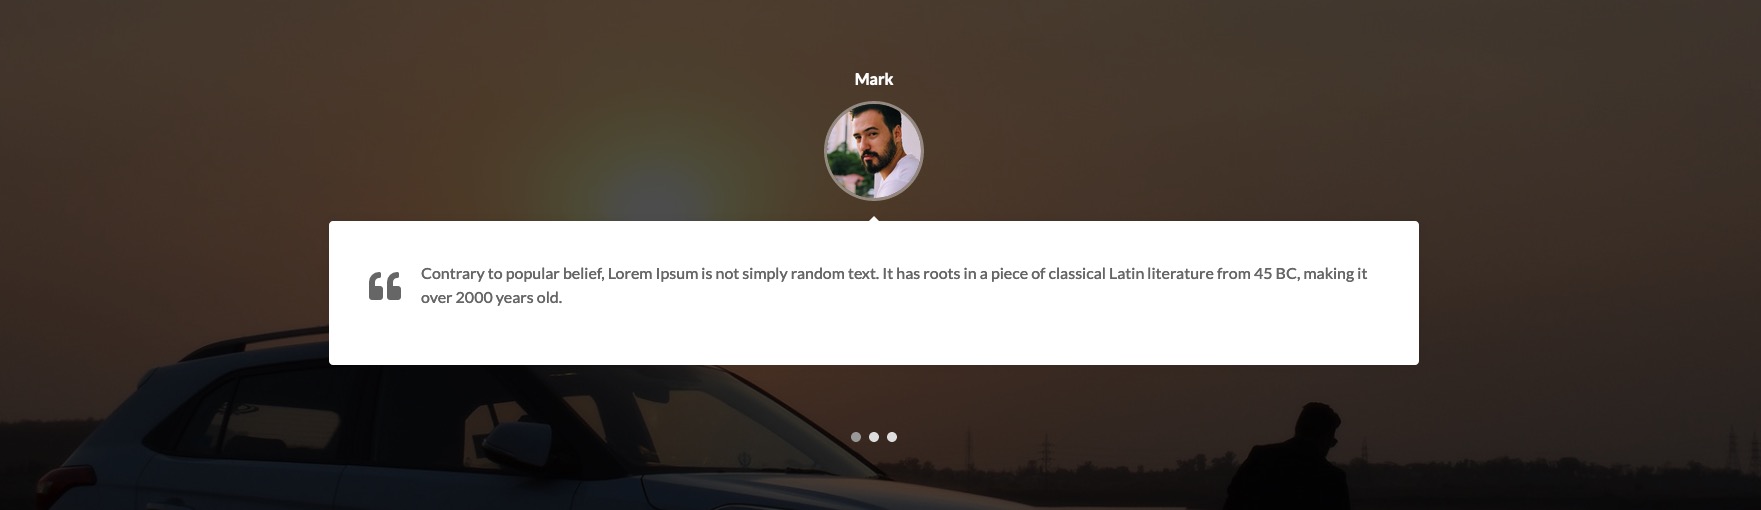
Click here to read our Knowledge Base post that explains the VikWP Text Slide widget in more details.
Here the list of the sidebar where this widget has been used on our Adventures demo website.
Sidebar Name: Testimonials Section
VikWP Grid Content
VikWP Grid Content is a widget loaded by the VikWidgetsLoader plugin, which allows you to display the posts of category in a grid layout.
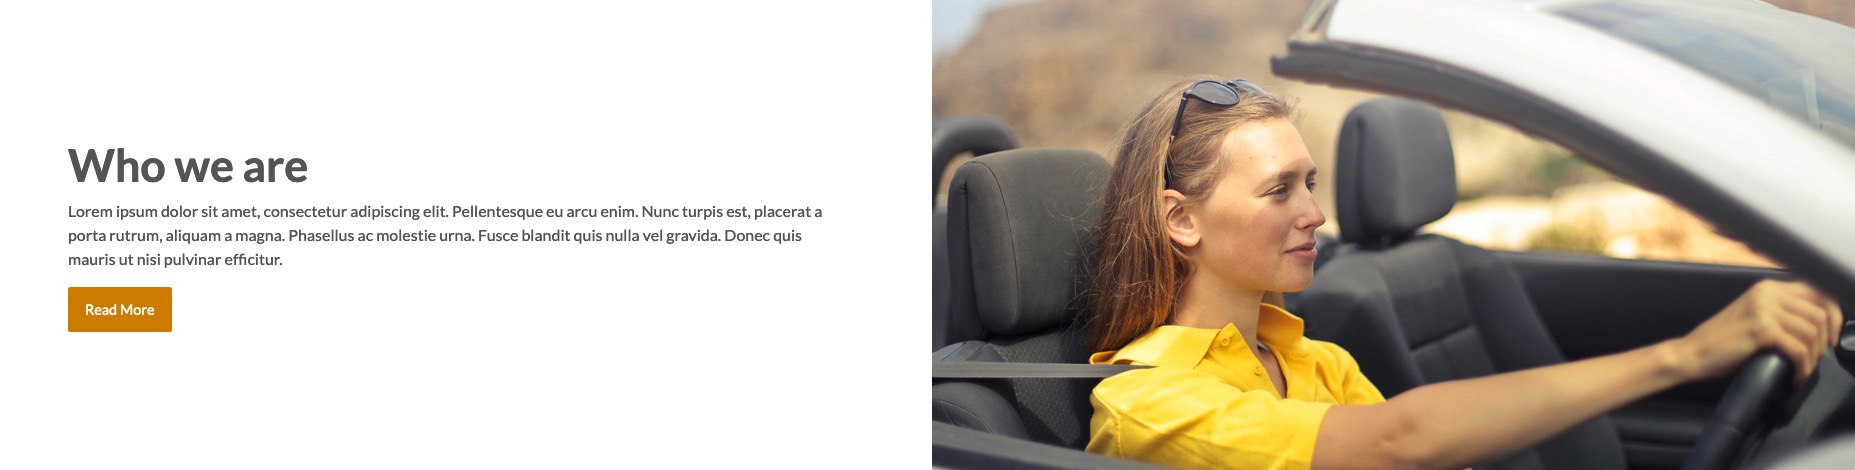
In the widget parameters you can specify the number of posts you wish to see, select the category of posts to be shown and if you'd like to have a background image. You can also choose whether to display some read more text that links to the full post, or not.
Click here to read our Knowledge Base post that explains the VikWP Grid Content widget in more details.
Here the list of the sidebar where this widget has been used on our Adventures demo website.
Sidebar Name: Who we are section
VikWP Google Maps
With this widget you can locate your important points with Google Maps, the widget allows you to customize every point with a marker, title and description.
Set the latitude and the longitude coordinates of your locations and optionally add a text, a description and a customized image and shadow for the marker.

Click here to read our Knowledge Base post that explains the VikWP Google Maps widget in more details.
Here the list of the sidebar where this widget has been used on our Adventures demo website.
Sidebar Name: Google Maps and Contacts Sections
VikWP Counter
The VikWP Counter widget displays a number of counters from 0 to a specific number. It'd be useful if you'd lke to show the numbers of your activity.
Click here to read our Knowledge Base post that explains the VikWP Counter widget in more details.
Here the list of the sidebar where this widget has been used on our Adventures demo website.
Sidebar Name: About Us - Info Content (About Us page)
VikWP Speakers
With the VikWP Speakers widget you can create as many staff brief information as you want. It'd be useful if you'd lke to show your company stuff.
Click here to read our Knowledge Base post that explains the VikWP Speakers widget in more details.
Here the list of the sidebar where this widget has been used on our Adventures demo website.
Sidebar Name: About Us - Info Content (About Us page)
Theme Customizer
This section explains the Theme Customizer of the Adventures Theme. You have already seen this section for the Logo and Slider setup, although you could do many more things. From this Customizer you can setup backgrounds, fonts, text sizes and much more.
Settings
Layout Settings
From this section, you'll be able to hide/show title pages, meta information and enable the Cookies message.
Logo Settings
We've already seen this function in the Logo Setup chapter of this documentation.
Menu Settings
- Menu Sticky: This parameter will let the header follows the vertical scolling navigation of the website.
-
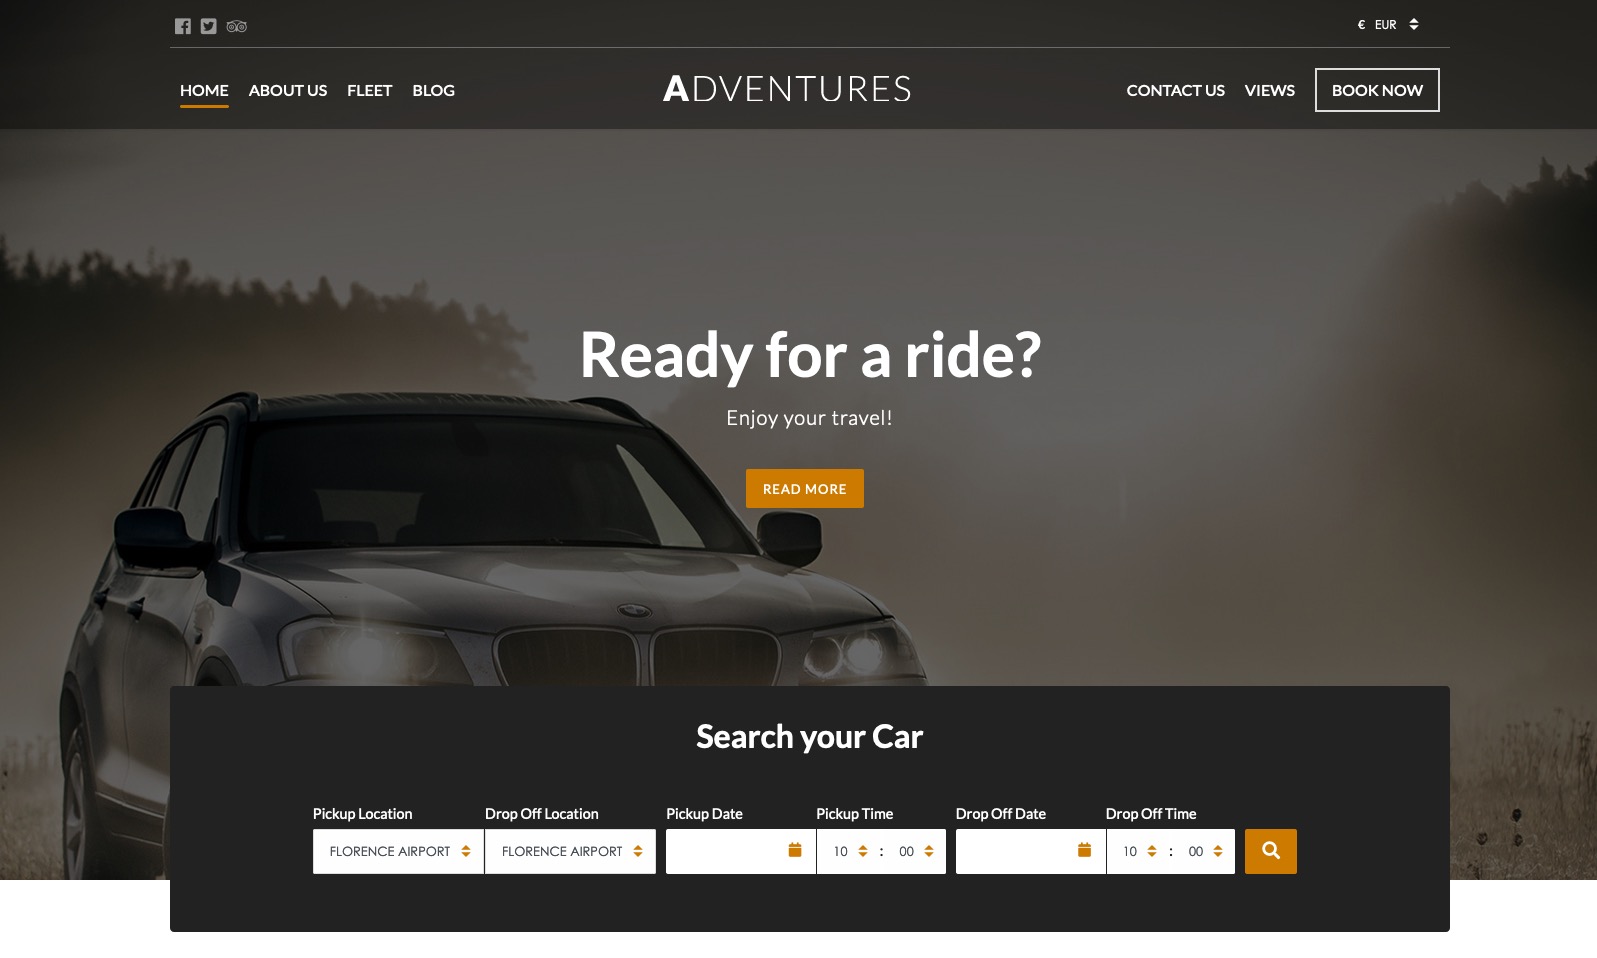
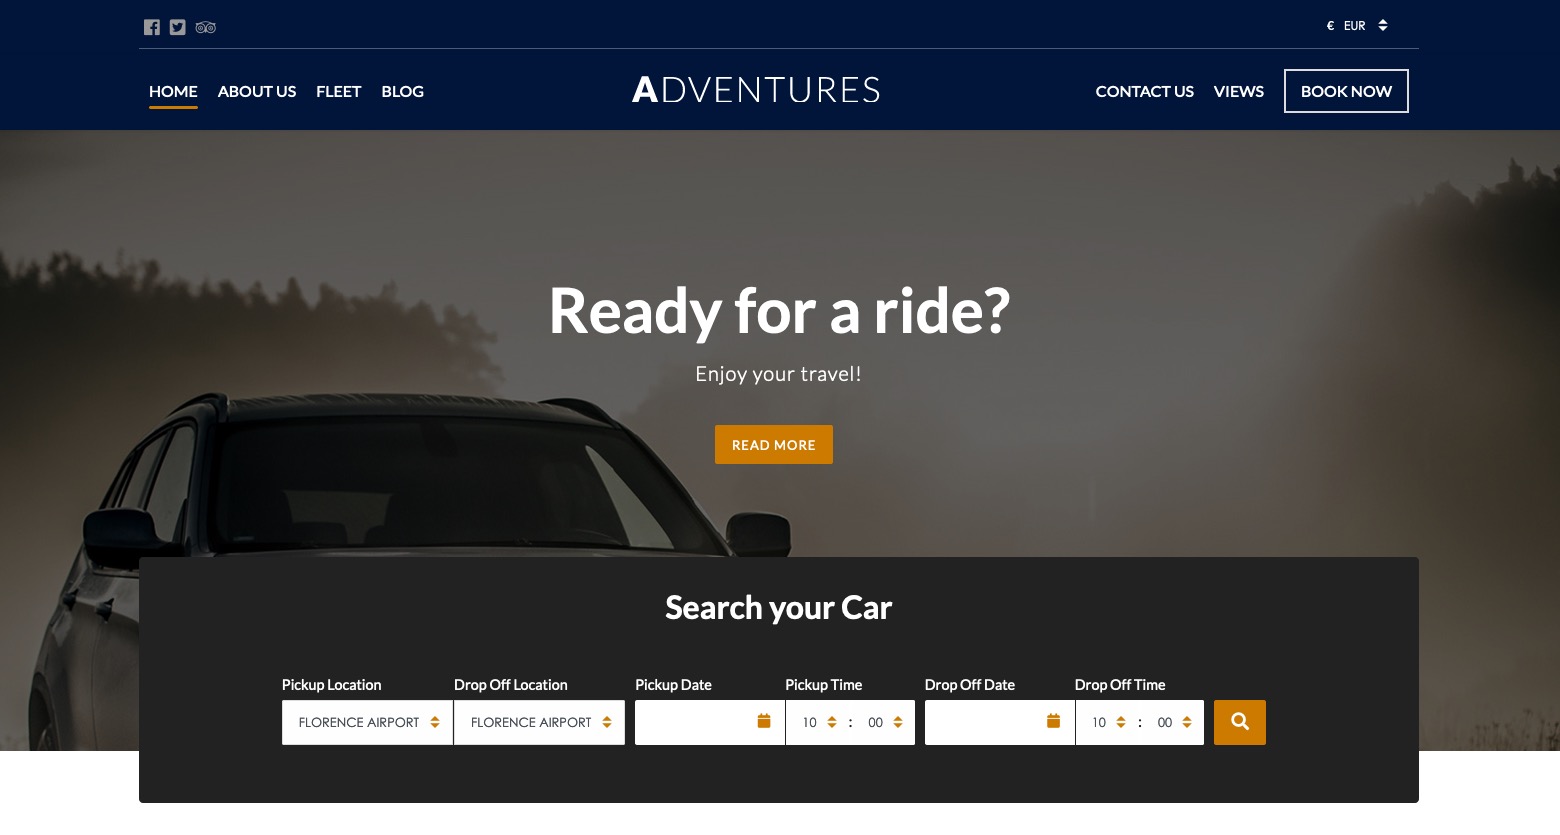
Homepage - Header Position: With this parameter you can choose to display the header over the slider or in the top of it.
By choosing "Over Slider", your header will be displayed with a black background with transparency. By choosing "Top" instead, the theme will apply the color background selected in the Header Background parameter. On this last case, the slider will not take all the window size in width and height, but just in width, the height will be calculated automatically.
Here some screenshot of the two choices.Over Slider
Top (In this case we have selected a blue header background)
- Internal Pages - Header Position: This parameter works in the same way of the Homepage - Header position. But it'll manage the internal pages.
- Menu Text Color: This parameter setup the color of the menu text for homepage and internal pages.
Responsive Settings
- Color Menu Icon This parameter set the color for the Menu and Text icon during the responsive layout.
- Menu Text This text will be displayed next to the responsive icon.
- Responsive Width The responsive framework will be displayed below this value.
Cookies Policy
You can set different parameters related to your Cookies Policy, most of which will be displayed in a banner at the bottom of your site, which your clients will be able to see until they view and accept your Cookies Policies. The following parameters can be set:
- Cookies Description: The text displayed in the cookies banner at the bottom of the page.
- Further Information Button: The text displayed in the button that redirects your clients to your Cookies article page.
- Agree Button: The text displayed in the button that makes your clients accept your Cookies Policies.
- Page Linked: The page linked to by the Further Information Button.
Colors
Choose your favourite color for your website with our theme.
Change the colors scheme of your theme through the Customizer Theme.
- From your WordPress Dashboard, go to Appearance > Customize > Colors

The "darker" version color are mainly used for the link status such as focus and active, and backgrounds of the responsive menu.
Fonts
The Adventures theme has a big selection of Fonts for your website.
To setup the fonts go on:
- WordPress Dashboard > Appearance > Customize > Fonts
On this panel you can change the font family for your Titles or even for the general text Body.
You can also select the font size of your Body text, the Menu and for each Heading type.
Here the panel image:

From the version 1.1.16
We added the Google Custom font family section. Please check the related tutorial to know how to add your Google Font family: https://vikwp.com/
Menus Setup
You can setup the menu in the WordPress administration Appearance > Menus.
To know how to setup a WordPress Menu, please follow our relative Knowledge Base: WordPress Menu Setup.
As you can see, on this theme you can have the logo positioned in the middle of the menu. This menu are two separeted menus, positioned respectively in the "Main Menu Left" and "Main Menu Right" positon.
If you'd like to have the Logo positioned on the left side instead of the center, you need to just setup your entire menu in the "Main Menu Left".
To set a menu as our "Book Now" button, you should add the menu class "linkmenu-alt".
Menu CSS Classes
How to add a menu class?
- First of all you should check if you have the class menu parameter enabled, by default WordPress disable it. In the screenshot below there is the initial situation with the class menu parameter disabled.

In this image example the parameter is disabled by default from WordPress. - Now we need to ebable the parameter. Always in the Menus page of WordPress, you should click on the "Screen Options" button in the top right of the page. Here the screenshot with the button highlighted.

- By clicking on the "Screen Options" you'll be able to see all the global menu parameters. Check the CSS Classes parameter.
- Once you'll click the CSS Classes check, the Css Classes parameter appear in the menu item. On the field of it you could add your CSS Class. Here a screenshot with the points.

Page Layouts
In this part of the documentation will explain how to setup the Homepage, About Us and Contact Us as our demo website step by step.
Homepage
Header Configuration

- 1 This is the VikWP Icons widget (this widget has been already explained on this chapter).
We listed just the parameters that we've changed from the default values.- Icons Displayed 3
- Icons Size: 18
- Padding Size: 1
- Container Size: Full Size
- Content Alignment: Default
- Icon Alignment: top
Sidebar: Top Bar - Left - 2 This is the VikRentCar Currency Converter widget, it is part of the Vik Rent Car package. This widget converts the currency of the Cars rates.
We listed just the parameters that we've changed from the default values.- Show only within VikRentCar No
- Currency Name Format: Three Letters
Sidebar: Top Bar - Right - 3 This is the Main Menu Left, you can configure it from the admin WordPress Appearance > Menus. The menu has been added in the "Main Menu Left" sidebar.
For more information about how to configure the menus, please the read the specific chapter here. - 4 This is the Main Menu Right, you can configure it from the admin WordPress Appearance > Menus. The menu has been added in the "Main Menu Right" sidebar.
For more information about how to configure the menus, please the read the specific chapter here. - 5 This is the VikRentCar Search Form widget, it is part of the Vik Rent Car package. This widget allows you to search a car available in the dates and location selected.
We listed just the parameters that we've changed from the default values.- Title Search your Car
- Form Orientation Horizontal
- Custom Search Button Text: < i class = "fas fa-search" >< /i > (remove all the spaces inside this code)
- Show Categories No
- Page Select one page that contains a shortcode of Vik Rent Car.
Sidebar: Car Rental Search Section
Our Cars Section

-
6 This is the VikRentCar Cars. This widget is part of the Vik Rent Cars package. It displays all the cars on your VikRentCar plugin.
We listed just the parameters that we've changed from the default values.- Title: Our Fleet
- Total Number of Vehicles Displayed: 4
- Vehicles per row: 3
- Show Description: No
- Page: Select one page that contains a shortcode of Vik Rent Car
Sidebar: Our Cars Section
Extra Services Section

-
7 This is the VikWP Icons widget, we've already explained this widget on this chapter. Here all the details about it in the homepage.
We listed just the parameters that we've changed from the default values.- Title: Extra Services
- Icons Displayed: 6
- Icons Size: 24
- Icons Style: Default
- Container Size: Normal
- Icons Padding: 4
- Icon Allignment: Left
- CSS Class: mod-services text-center
Sidebar: Extra Services Section
Testimonials Section

-
8 This is the VikWP Text Slide. We've already explained this widget on this chapter. Here all the details about it in the homepage.
We listed just the parameters that we've changed from the default values.- Image: Select your background image
- Testimonials Layout: Carousel
- Testimonials per Row: 1
- Featured Image position: Above
Sidebar: Testimonials Section
Who We Are Section

-
9 This is the VikWP Grid Content. We've already explained this widget on this chapter. Here all the details about it in the homepage.
We listed just the parameters that we've changed from the default values.- Select Category: Select the category containing the post for this area.
- Limit: 1
- Post per row: 1
- Button All Category Posts: : No
Sidebar: Who We Are Section

-
10 VikWP Google Maps. We've already explained this widget on this chapter. Here all the details about it in the homepage.
We listed just the parameters that we've changed from the default values.- Height (in px or %): 400px
- Map Zoom Level: 8
Sidebar: Google Maps and Contact section
UpFooter, Footer and Copyright

-
11 VikWP Icons Widget (you can find the widget explaination here).
We listed just the parameters that we've changed from the default values.- Icon Displayed: 3
- Icon Size: 14
- Padding Size: 12
- Container Size: Full Size
- Icon Alignment: Left
- CSS Classes: footer-contacts width33
Sidebar Name: UpFooter -
12 The footer is composed by three widgets:
- Text: it contains a general text.
- Navigation Menu: Info Footer.
- Text: it contains the opening information.
Sidebar Name: Footer -
13 The copyright text is managed from the Customizer section of the theme. To change the copyright information, please, go in the Appearance > Settings > Copyright Settings.
About Us
Header
This chapter explains how to get the About Us page as our demo website.

1 At first we've created a new page named About Us.
To have the same layout as our demo website, you should select the template page "About Us". To do so you need to select from the Page Attributes the Template Page "About Us".
If you'd like to have a background image for the page title as our demo website, you should add your image in the Featured Image.
Here the page configuration:

In our case we are using the native Gutember Editor.
The text block with the grey background is a Quote block layout from the "Common Blocks" on Gutember.
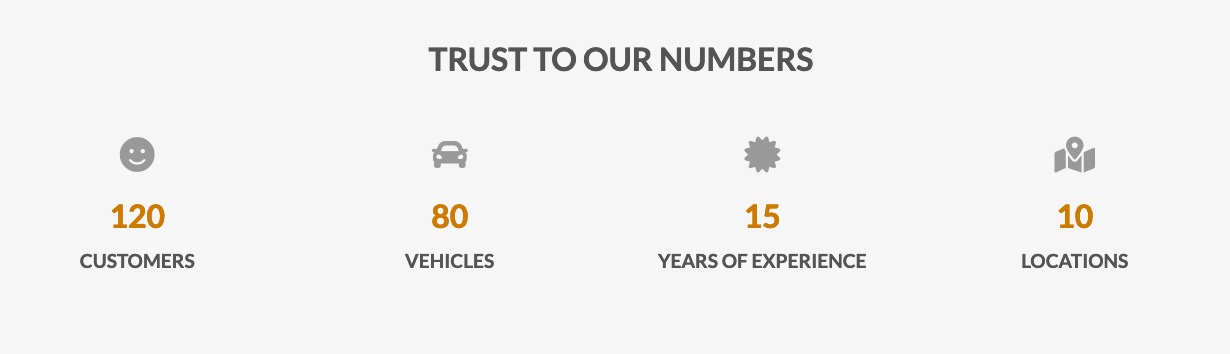
Trust to our number widget
-
2 This is the VikWP Counters widget (this widget has been already explained on this chapter).
We listed just the parameters that we've changed from the default values.- Title: TRUST TO OUR NUMBERS
- Number of Counters: 4
- Padding Size - from 1 to 12: 3
- CSS Class: bg-grey
Sidebar: About Us - Info Content
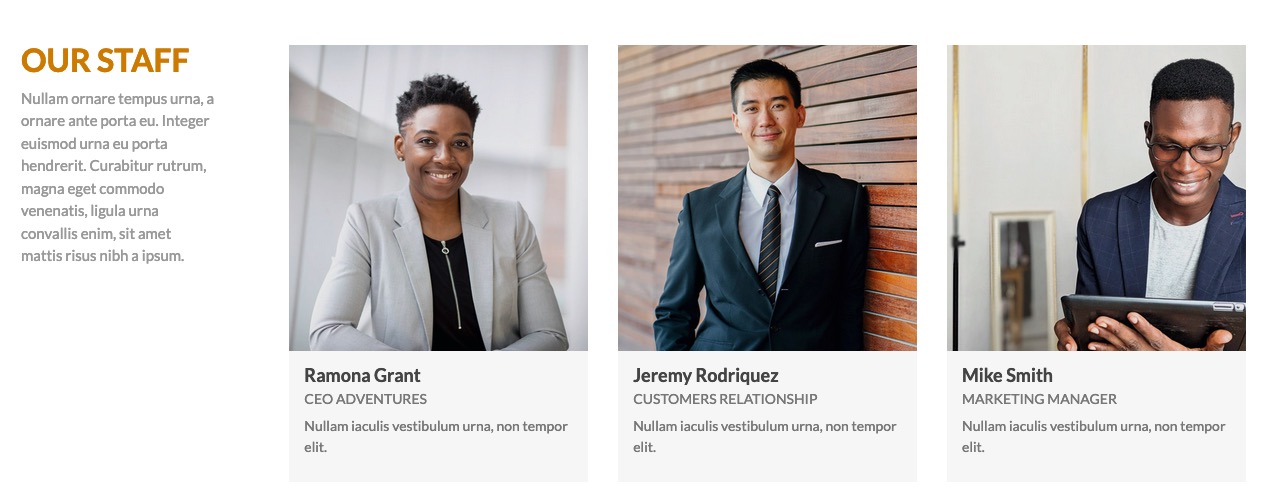
Our Staff widget
-
3 This is the VikWP Speakers widget (this widget has been already explained on this chapter).
We listed just the parameters that we've changed from the default values.- Number of Speakers: 3
- Number of Rows: 1
- Text Area: see the code below:
<h3 class="text-color">OUR STAFF</h3>
<p>
  Nullam ornare tempus urna, a ornare ante porta eu. Integer euismod urna eu porta hendrerit. Curabitur rutrum, magna eget commodo venenatis, ligula urna convallis enim, sit amet mattis risus nibh a ipsum.
</p>-
Here the sidebar name for the "Our Staff" widget.
Sidebar: About Us - Info Content
Contact Us
Header
This chapter explains how to get the Contact Us page as our demo website.
-
As we did for the About Us page, we did also for the Contact Us.
After you have created the page with the text, you should select from the Page Attributes the Template "Contact Us", in this way the page will show the "Contact Us - Under Content".
Also in this case we have added a Featured Image as background of our title "Contact Us".

-
1 The form that you can see in our demo website is the external Contact Form 7 plugin. This is a very famous plugin that you can find in the WordPress Repository. You can find it on this link.
If you'd like to use the same plugin and to have the same layout as our demo website, here below you can find the code of our form, you can copy and paste it on your own form:
<div>
<p>
<label>Name</label>
[text* your-name]
</p>
</div>

<div>
<p>	<label>Telephone</label>
[tel telephone]
</p>

<p>		<label>Email</label>
[email* your-email]
</p>
</div>

<div class="contact-row">
<p>
<label>Message</label>
[textarea your-message]
</p>
</div>

<div class="contact-row">
<p>
[submit "Send"]
</p>
</div>-
We used the WordPress native widget Text. In fact this widget accepts shortcodes, you can easily copy and paste your Contact Form 7 shortcode on the textarea of this widget.
Sidebar: Contact Us - Under Content
-
2 This is the VikWP Icons widget (this widget has been already explained on this chapter).
We listed just the parameters that we've changed from the default values.- Title: HOW TO FIND US
- Icons Displayed: 5
- Icons Size: 24
- Container Size: Full Size
- Padding Size: 12
- Content Alignment: Default
- Icon Alignment: Left
Sidebar: Contact Us - Under Content
Page Templates
With this theme you can show and manage the page layout of your page. Based on the chosen template structure you'll display differently the layout and choose which sidebars to show.
To select the right structure for your page, please follow this steps:
- WordPress Dashboard > Pages.
- Select the page your want to modify.
- From the Page Attributes panel select the Template you want from the dropdown.
- Click on Update.
Can't you see the Page Attributes panel? Enable it from the above Screen Options panel.
Here the Templates Page list, and a small description and example of every template:
- Default Template
- Home Page
- About Us
- Contact Us
- Blank Page
- Extra Service Sidebar
- Testimonials Sidebar
- Left and Right Sidebar
This is the default structure for you page. This page will not load any sidebar.
Home Page
This page template has all the sidebars enabled. We strongly suggest to use this structure for your Home Page.
About Us
This Page Template need to be used for the About Us page, this layout will print all the About Us sidebars, in this way you'll avoid to load all the widgets of the other sidebar.
Contact Us
This Page Template need to be used for the Contact Us page, this layout will print all the Contact Us sidebars and the Google Maps and Contacts Section, in this way you'll avoid to load all the widgets of the other sidebar.
Blank Page
This Page Template has been created to display just the content of the page, without menu, footer and sidebars. It would be useful for pages that needs to be loaded in overlay with modals or popup.
Extra Service Sidebar
This template will load just the Extra Service sidebar.
Testimonials Sidebar
This template will load just the Testimonials Sidebar.
Left and Right Sidebar
This template will load just the Right and Left Sidebars.
General Setup
Featured Image
As you could see in our demo website, in the internal pages you could have your title page with a background image. This happens in a page when a featured image has been selected.
The page title has been displayed with a fade effect, but you could also add a small description as our screenshot:

As you could see on this image, we have the page title with a small description below. This description is actually the Featured Image Caption. To add it, during the editing of the page, you should just click on the Featured Image and fill the "Caption" field in the right parameters of the image.
Show/Hide Widgets
On WordPress is not possible for a theme or for the cms itself to setup different widgets for different pages by default.
Please, read this post of our Knowledge Base to have some tips how to solve the problem.
Theme Update
To keep your theme updated, you should install and use the VikUpdater plugin. Please, check in our knowledge base article what is and how to use the VikUpdater plugin: https://vikwp.com/support/knowledge-base/vikupdater.