Your cart is empty!
PMS
PMS stands for Property Management System. This section includes several different management functions.
Operators
With the new release of Vik Booking 1.6.9 the system has seen a major upgrade in the Operators management system. Operators are special users, usually part of the staff, that can access some dedicated contents via front-end.

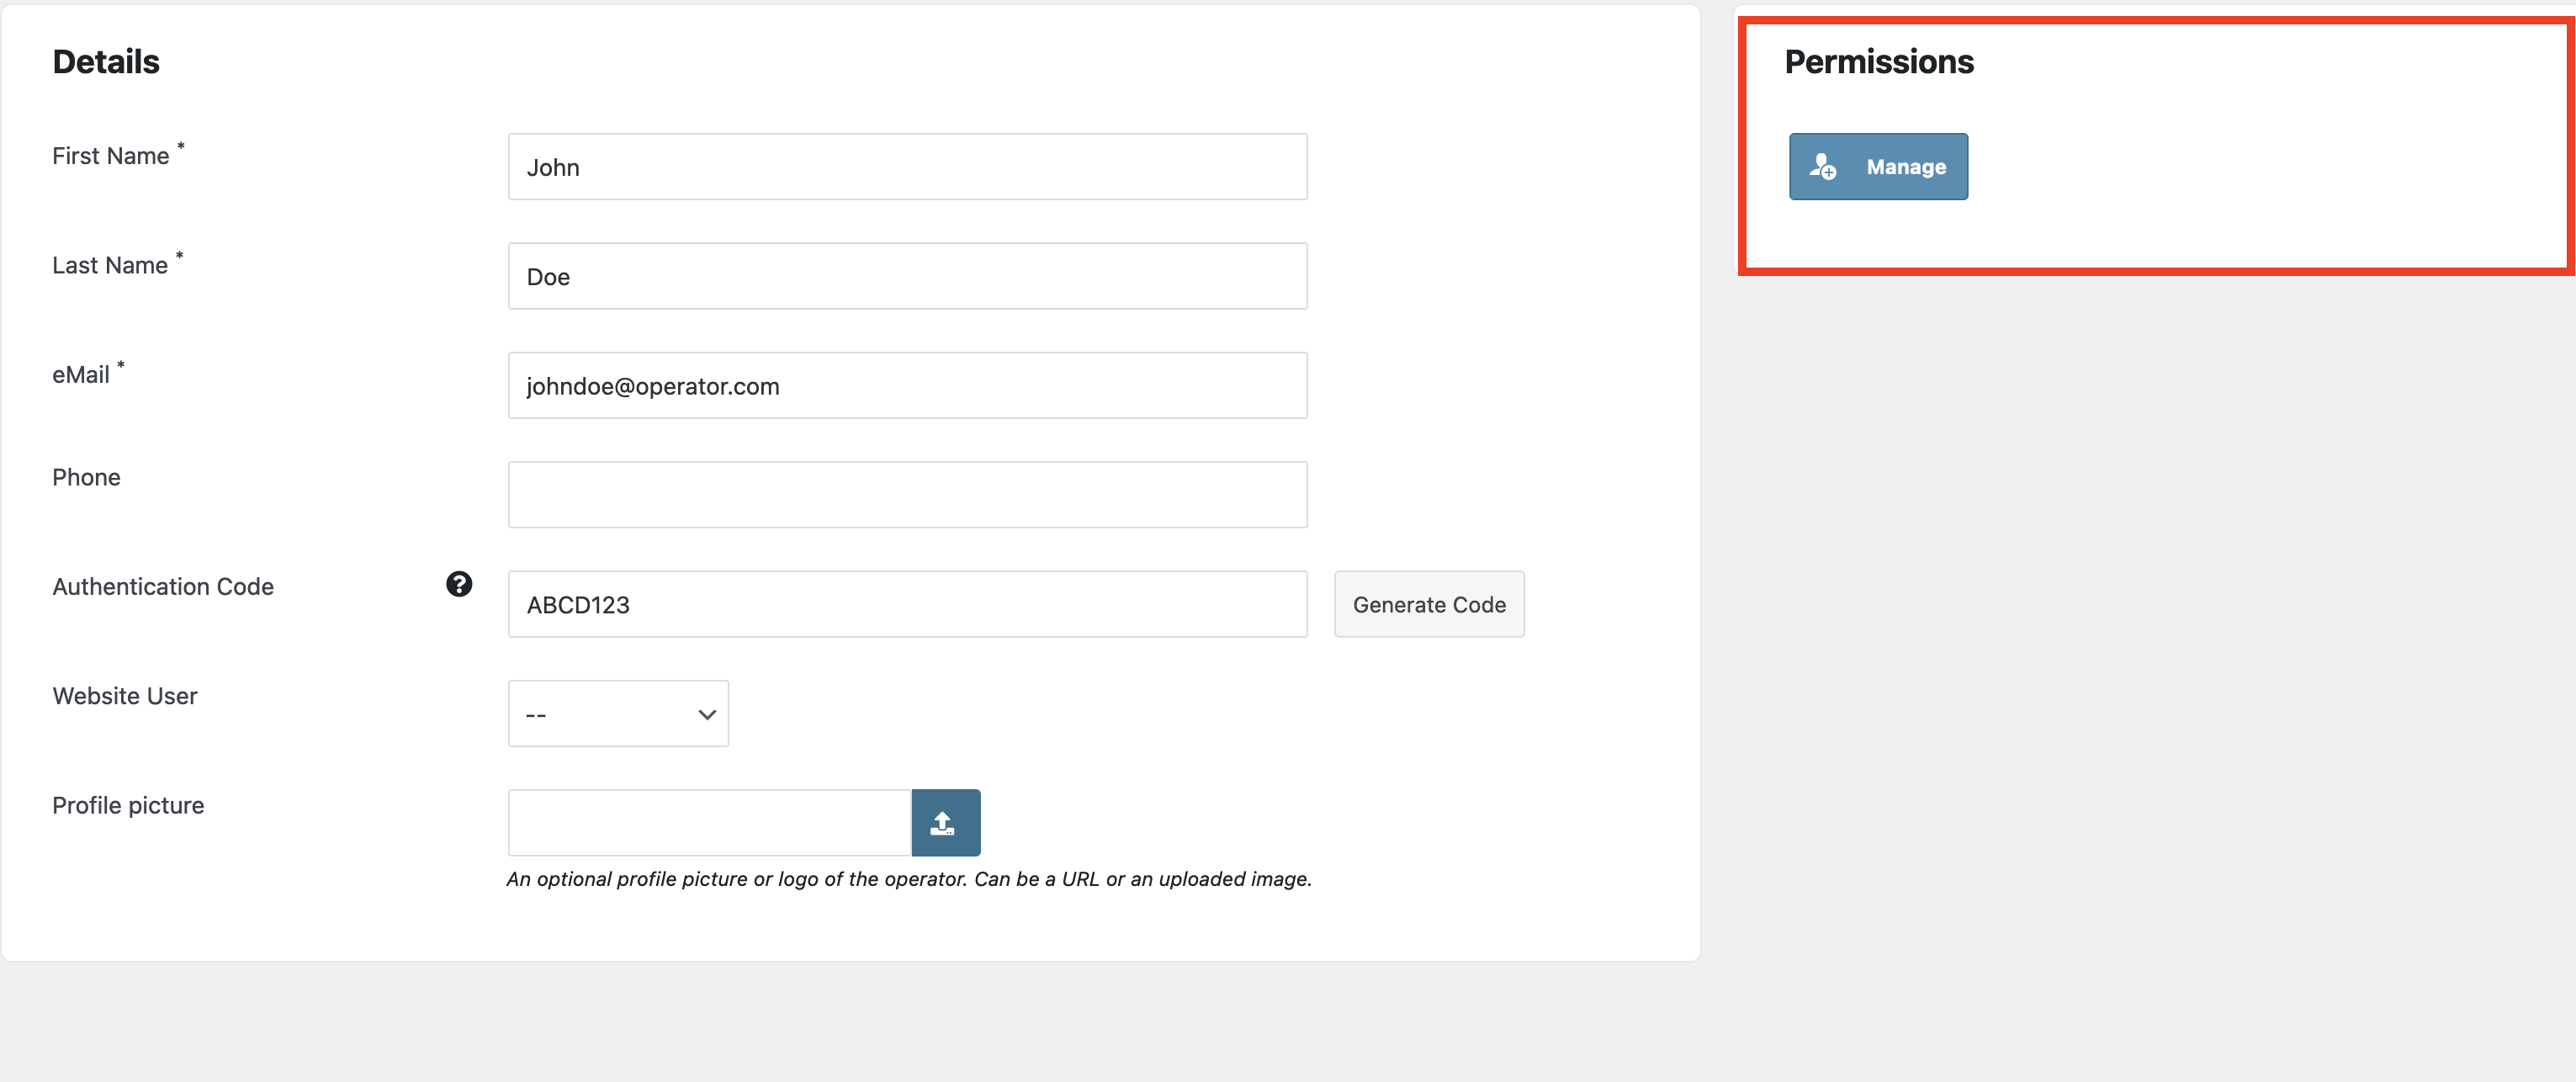
Unlike WordPress Users that can have different permission to access specific back-end pages, an Operator has Name, Last Name, Email and Phone Number as parameters, in addition to an AUTHENTICATION CODE that they will use to access the front-end private dashboard. Optionally, rather than the Authentication Code, operators can log in to their private front-end section by using a WordPress user. In this case it’s necessary to assign the Operator to a specific WordPress user.
Permissions for each operator can be managed directly in the “PMS - Operators” Page.
By default Vik Booking comes with two tools available for Operators:
- Tableaux;
- Finance.
In the first Tab “Active Permissions” you can check, edit or remove the current permission given to the selected operator.
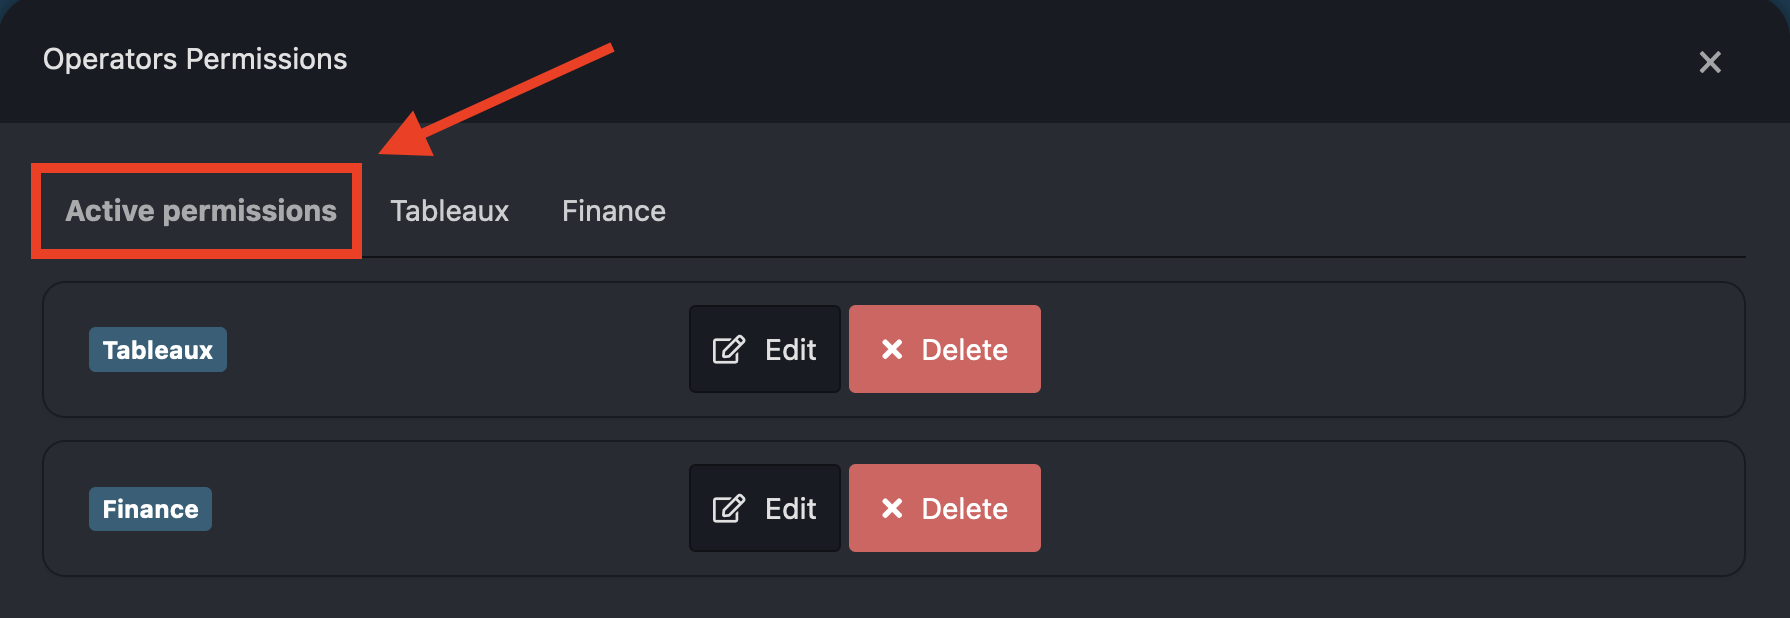
If you need to set permissions for a newly created Operator, you can do that by using the other tabs “Tableaux” and “Finance” which will be discussed in the next paragraphs.
Operators - Tableaux
When giving access to the tableaux to any of your Operators you can customize the access level each Operator has. There are four parameters to define this:
- Visible Days: Number of days ahead the Operator can check. If a negative value is set the Operator will also have access to past dates;
- Visible Rooms: Room-types the Operator have access to. If no room is selected the Operator will be able to access every room;
- Customer Details: If set to “Yes” the Operator can access the guests details. If set to “No” every information about the guests occupying the room will be hidden;
- Extra Services: If set to “Yes” the Operator can see the options and extra services assigned to the reservation. If “No” is selected Options and Extra services assigned to the reservation will be hidden.
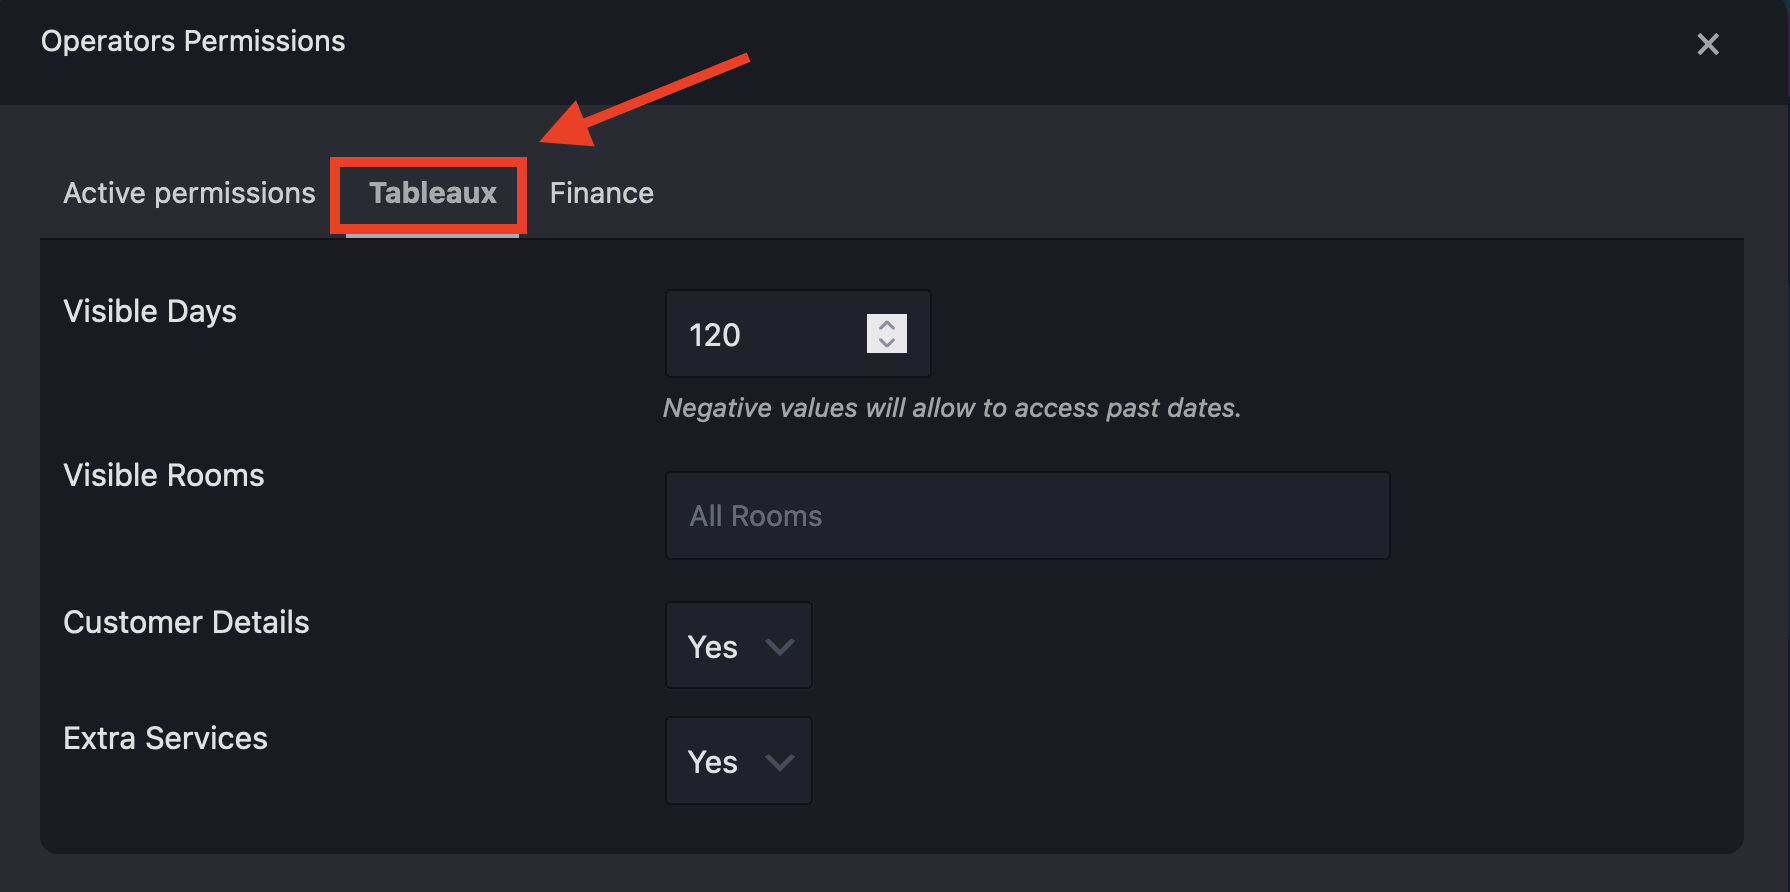
By clicking the “Save” button the selected operators will get the permissions to access the Tableaux according to the selected parameters. If permissions were given before, they will be replaced according to the new parameter configuration.
Operators - Finance
The Finance Tool contains information regarding the revenue of the structure. When setting up the permissions it is possible to define which rooms the operator should have access to.
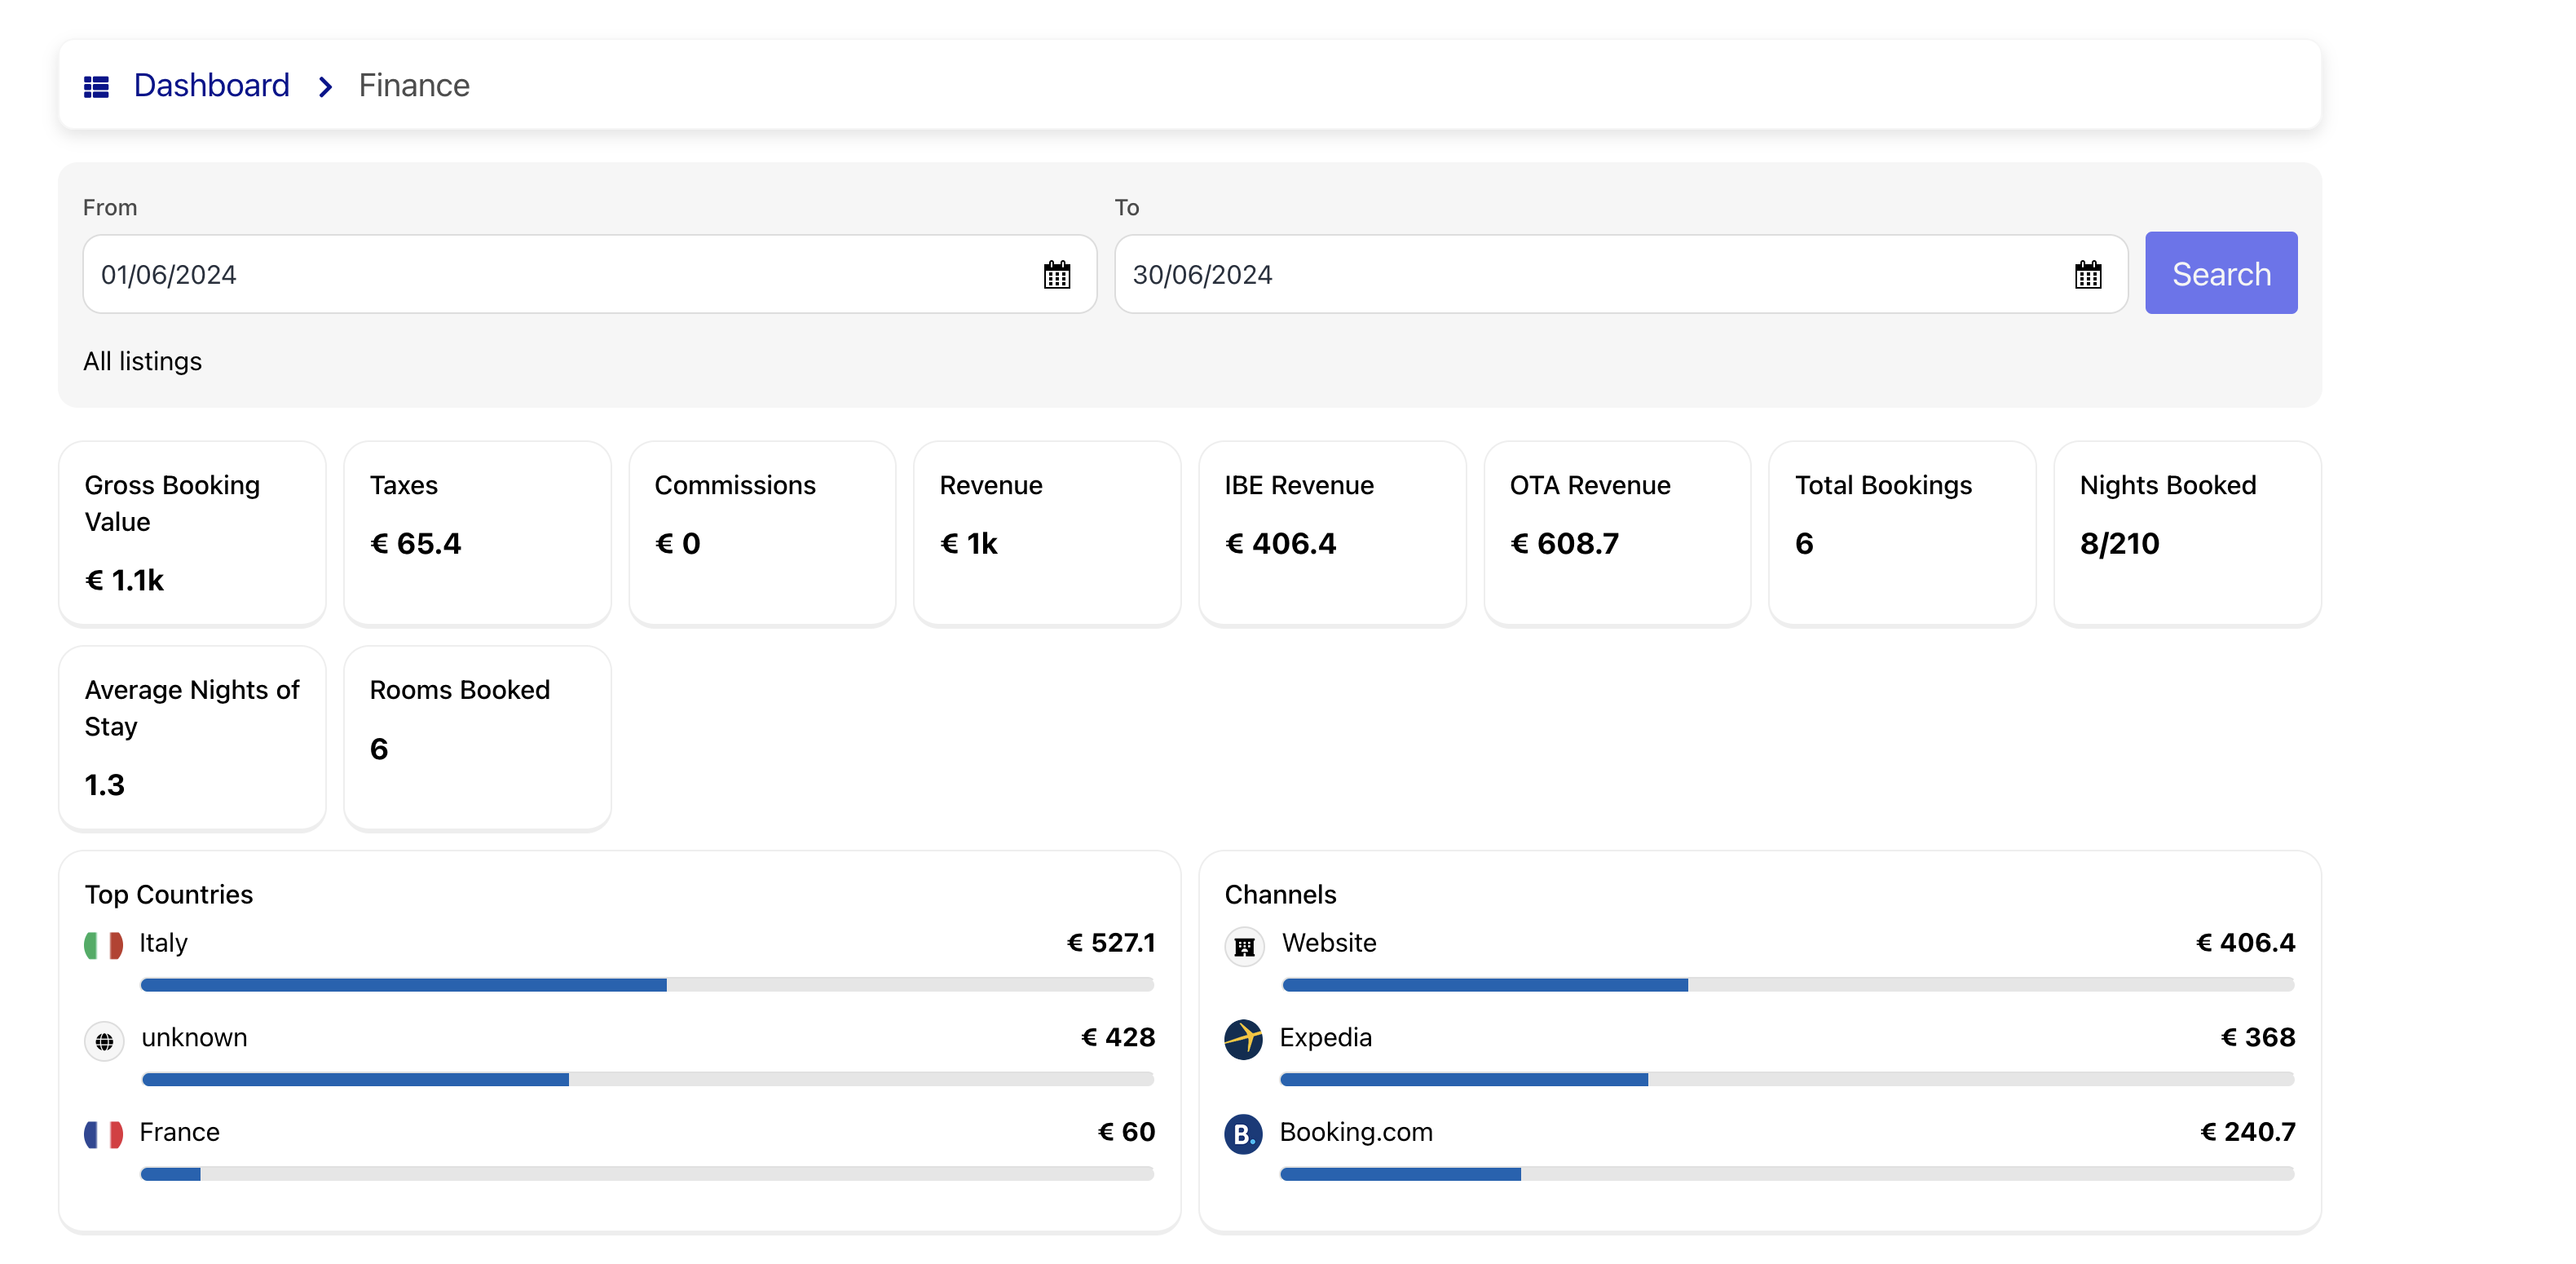
A date filter is available at the top to target a specific range of dates. Once selected you will get a financial report of the revenue of the reservations received for that period until that moment. Also, you can find information about the Top Counties per number of bookings and a ranking of the Channels that generated the higher number of reservations.

Operators can access the tools they have been permitted by using the Operators Login front-end page. Once inside they will find a menu with all the available tools.
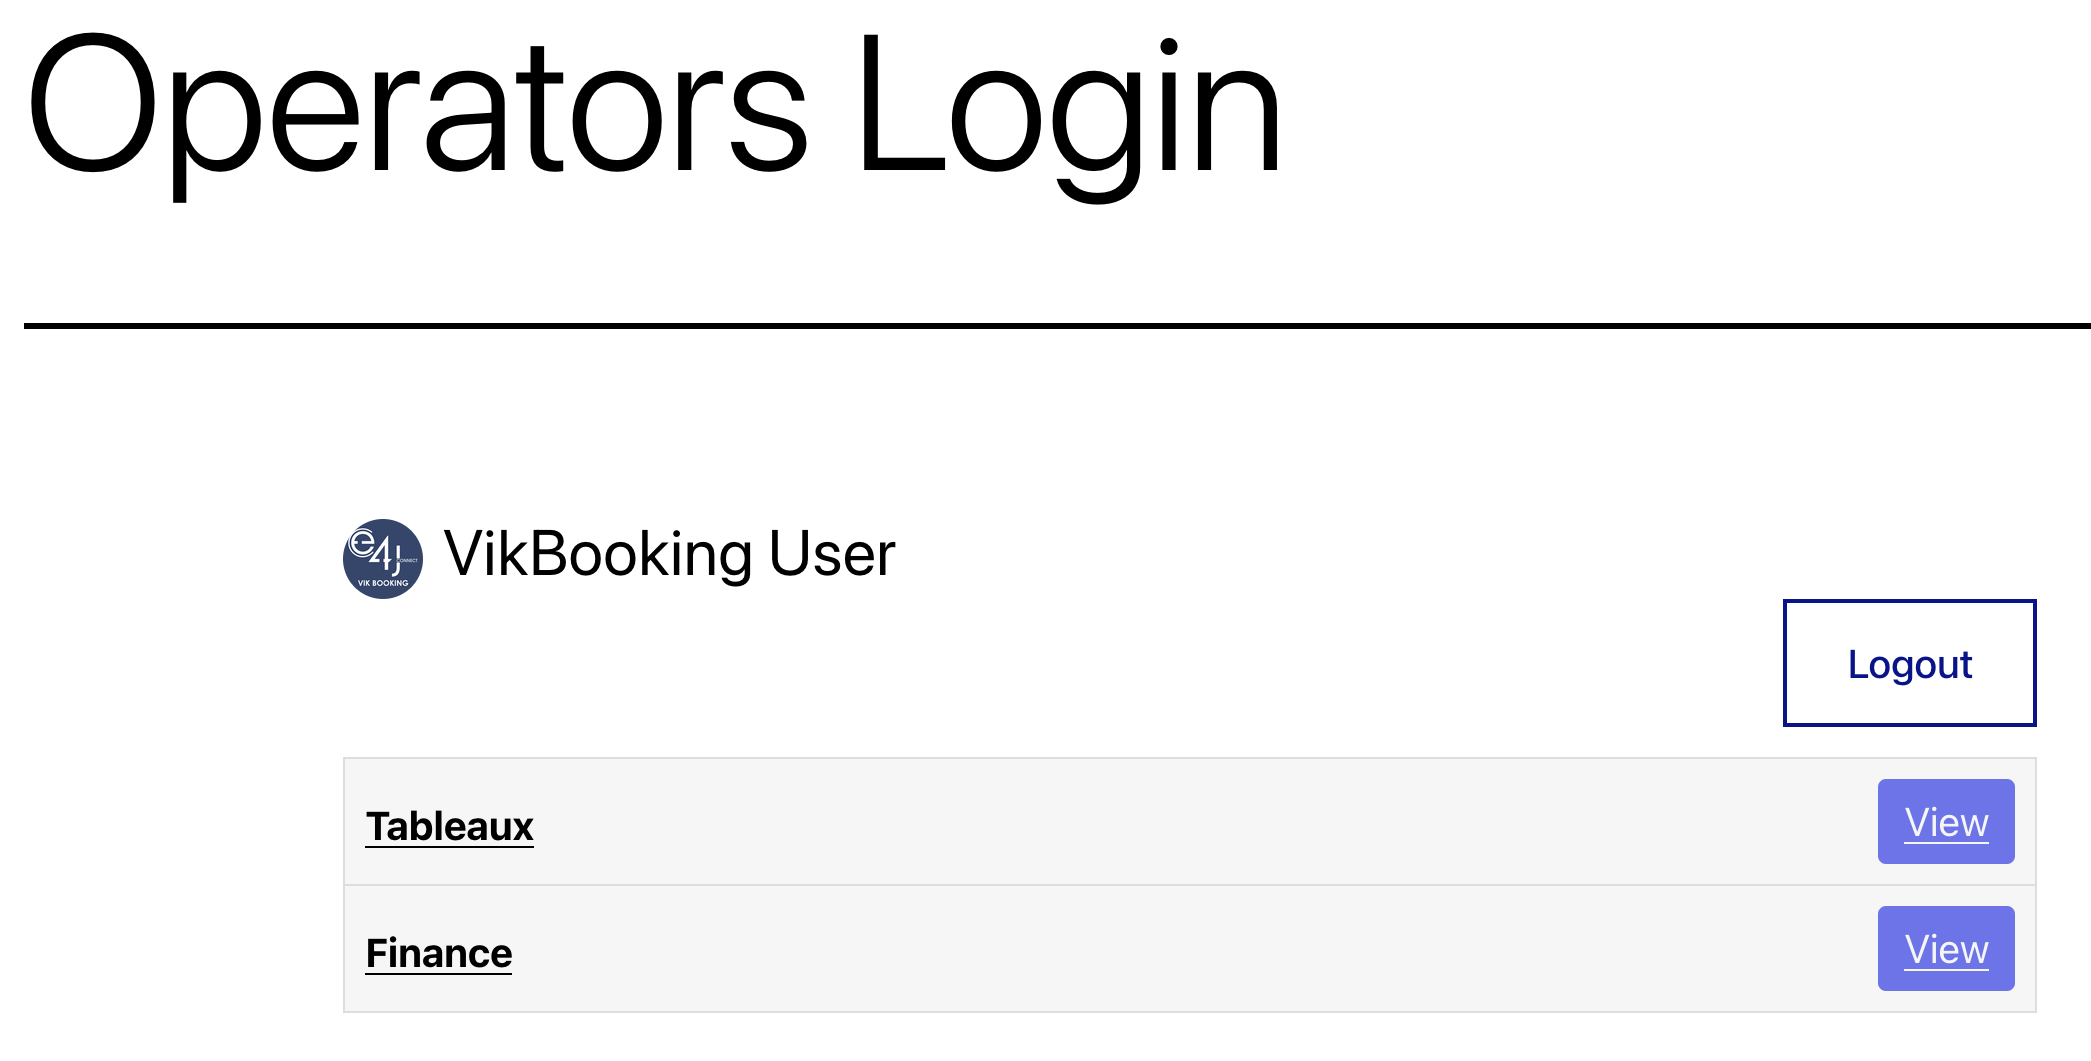
The Operators Login is a shortcode that can be created in the apposite “shortcodes” tab of VIk Booking that is found in the Dashboard of the plugin. Once created Operator can log into it using their “Authentication Code”.
The entire tool for the Operators management is fully customizable. By developing a specific plugin it is possible to extend its functionalities to better adapt it to any of your necessities. At this link, you can find documentation for developers on how to code a custom plugin for this: Custom Operator Tools
Tableaux

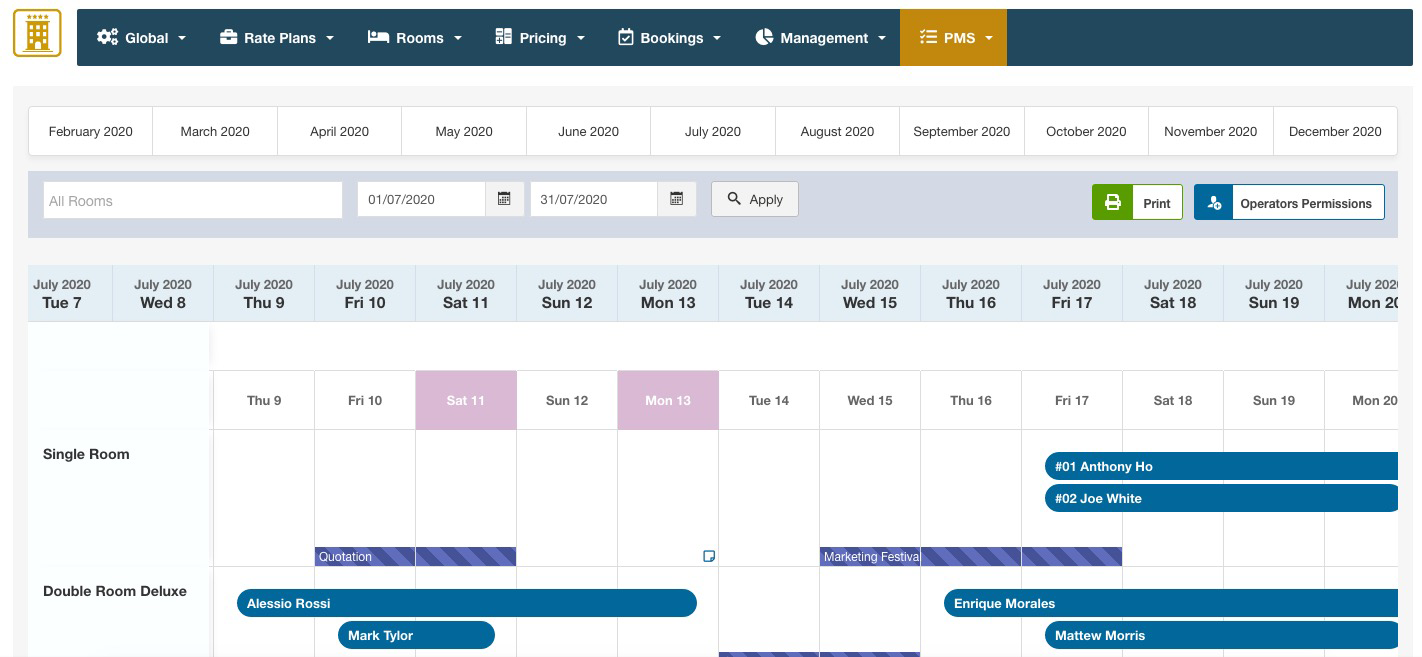
The page Tableaux shows an overview of all confirmed bookings for the various rooms, within a specific time range. The Tableaux can also be made available to the Operators in the front-end, after setting up the Permissions of the various Operators.
- Back-end: the screen shot below shows the administrator interface of the Tableaux, with the possibility of filtering the bookings per month, or by dates. By hovering the booking dates, a tooltip will be displayed with the information of the reservation. The back-end page allows printing functions and the management of the Operator Permissions.
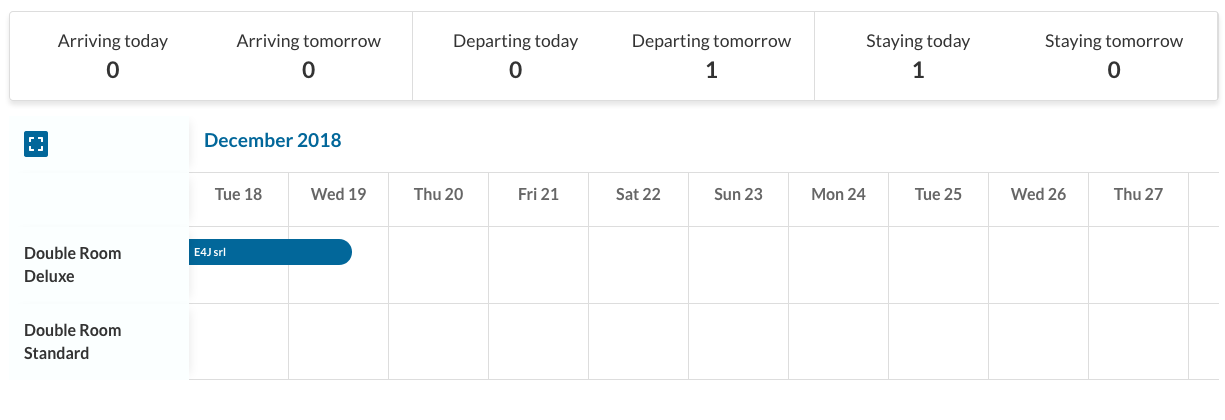
- Front-end: to access this page, you need to create a new Shortcode of type "VikBooking - Operators Login". In this page the operator will see only the rooms allowed by the permissions that were setup in the back-end. In the example below, this operator can only see two rooms because those are the ones assigned to his permissions. To access these page, the operator needs to login by using the personal AUTHENTICATION CODE or the WordPress User login to which the operator is assigned. Clicking or tapping on the booked dates will display some additional details of the reservation.
-
To add a note, simply make a lightly scroll down inside the box of the room of interest. Wait a few seconds and a small note icon will appear.![]()
Click on this icon to add your note in the pop-up window that will open up soon.
Once you will have inserted all your notes, you will have a complete overview like this one: 
N.B: Tableaux Notes created by the admin will be visible in front-end for a logged operator only in a view mode. No modification function will be allowed for the existing note from the front-end. However they will be able to create new ones.
Add events and festivities from the Tableaux
You can add some custom festivities or events days in the Tableaux, just like you did for the notes. But, instead of clicking on the rooms corresponding tab, you need to click on the specific day of the calendar on the top of the grid.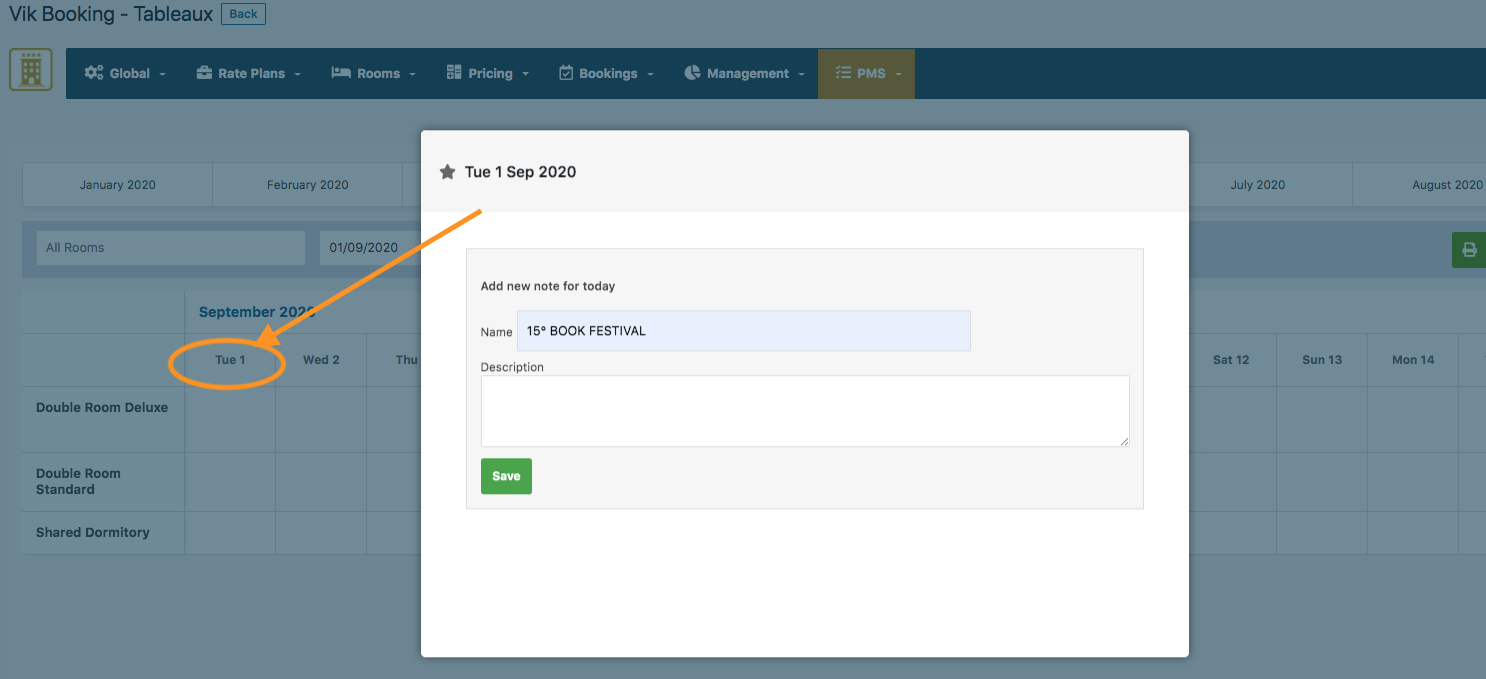
Click on your selected day and add the festivity name. After saving, the day with event will be highlighted in red.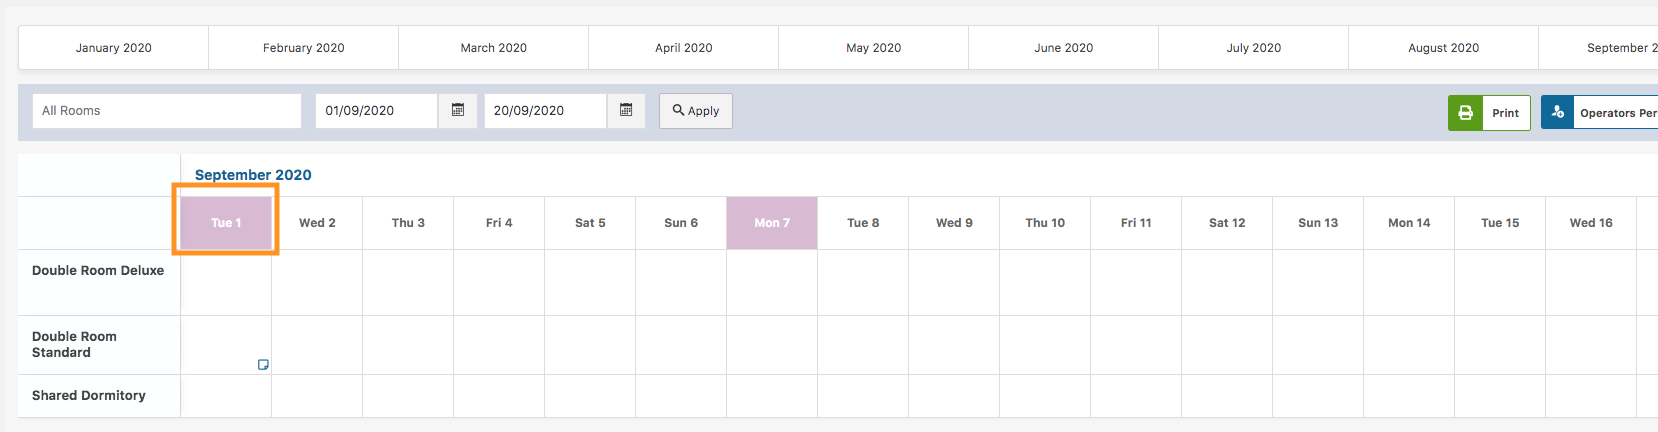
Reports

The Reports framework is a part of the system that can be extended through the creation of apposite PHP Classes that extend the parent interface. By default, Vik Booking is installed with several types of Reports to generate and/or export data.
Reports are useful to obtain financial statistics as well as to produce calculations of tax/levy. You can also generate and export documents for transmitting them to various institutions in case your country has such mandates.
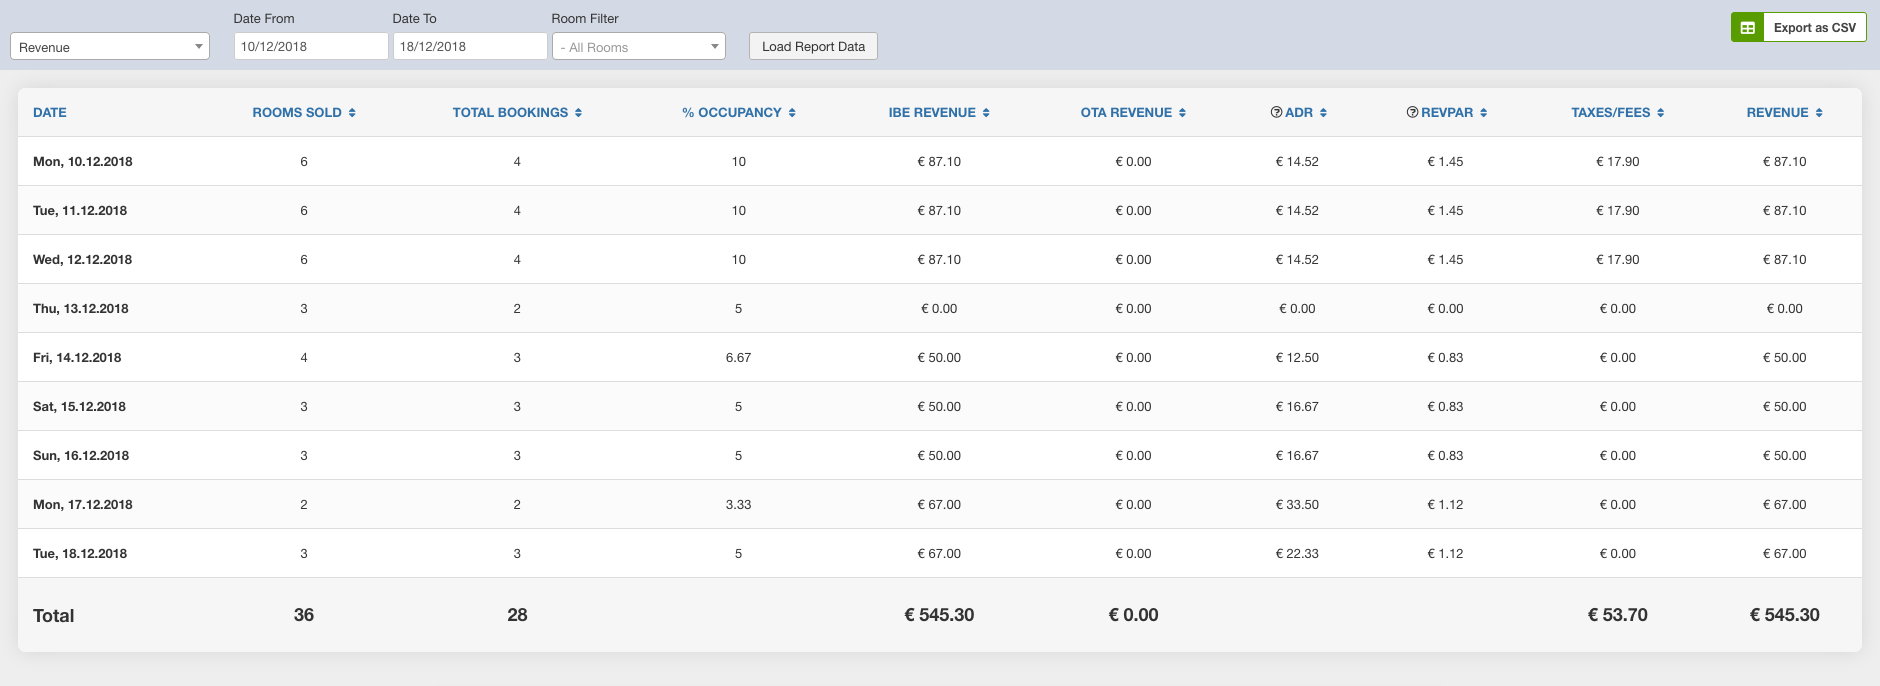
In the screen shot below you can see the calculation of the Revenue obtained on a specific range of dates for the bookings received.
Revenue
The Revenue Report provides a detailed overview of the financial performance of your property. You can apply up to three filters to generate more targeted results:
-
Date Range (required): Defines the time frame for the report. This filter is mandatory.
-
Listings (optional): If left empty, the report will include all room types. If specific listings are selected, only those will be included in the results.
-
Channels (optional): If no channels are selected, the report will include reservations from all sources (both direct website bookings and OTAs). Selecting one or more channels will filter the data accordingly.
This report helps you monitor several key metrics, including: number of rooms sold, total number of bookings, revenue generated from both the website and OTAs, paid commissions, Taxes/Fees.
Data is presented on a daily basis, with a total summary displayed at the bottom for the entire selected date range.
An Export button is available at the top of the page, allowing you to download the report data in CSV or Excel format. A Print option is also included for generating a physical or PDF copy of the report.

Daily Room Report
The Daily Room Report provides a quick and clear overview of the reservations received for the selected date range. In just a few seconds, you can access essential details such as: the booked meal plans, number of guests, rate plan, Check-in and check-out dates, type of stay (Arrival, departure, Stayover) and more.
This report allows you to easily monitor daily bookings and quickly understand the key elements of each reservation.
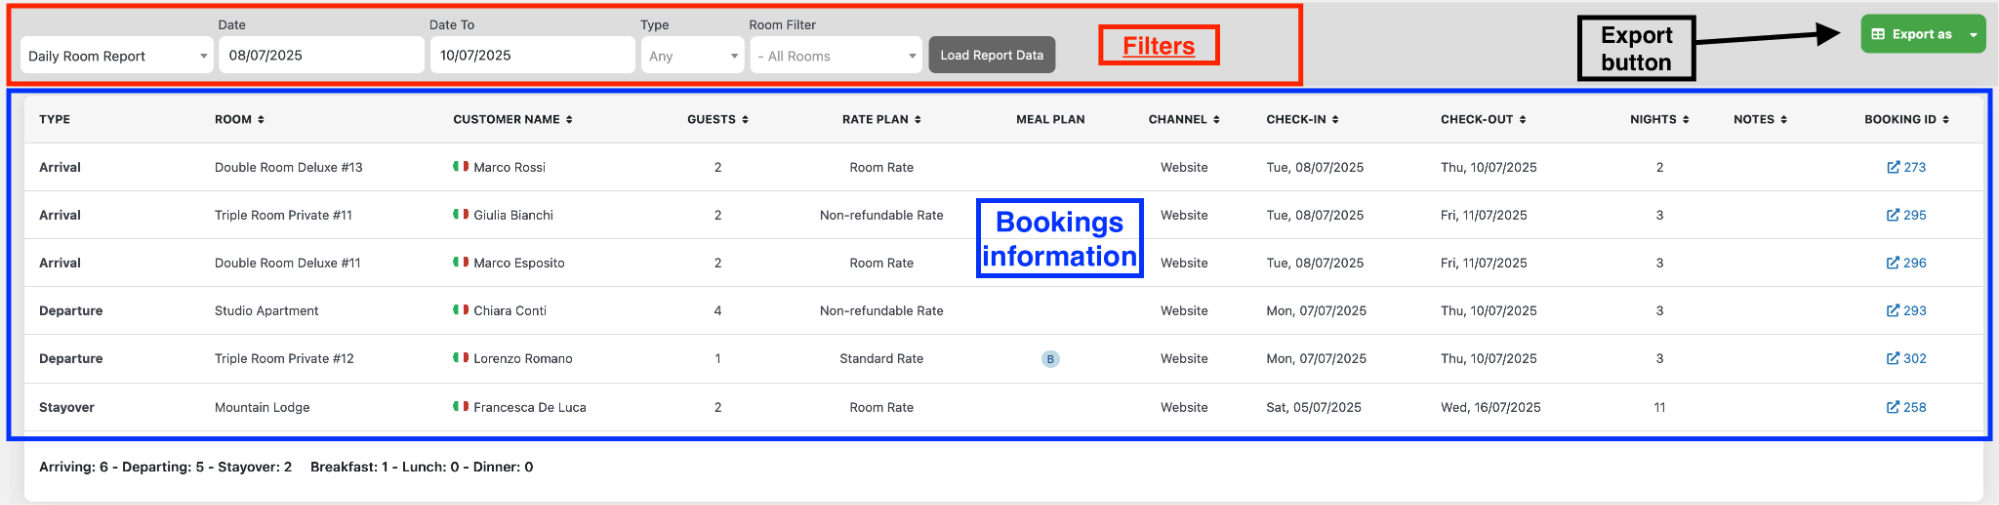
An export button is available for this report too.
Hotel - Meals
This report provides a quick overview of the meals for the selected dates.
It is especially useful when working with rate plans that include breakfast, lunch, and/or dinner.
The Export button at the top allows you to easily generate a physical copy to hand over to the kitchen, so they know exactly how many meals need to be prepared each day. Export in CSV and Excel are also available.
The number of breakfasts, lunches, and dinners to prepare is automatically calculated based on the meals included in the rate plan assigned to each reservation for the selected day.
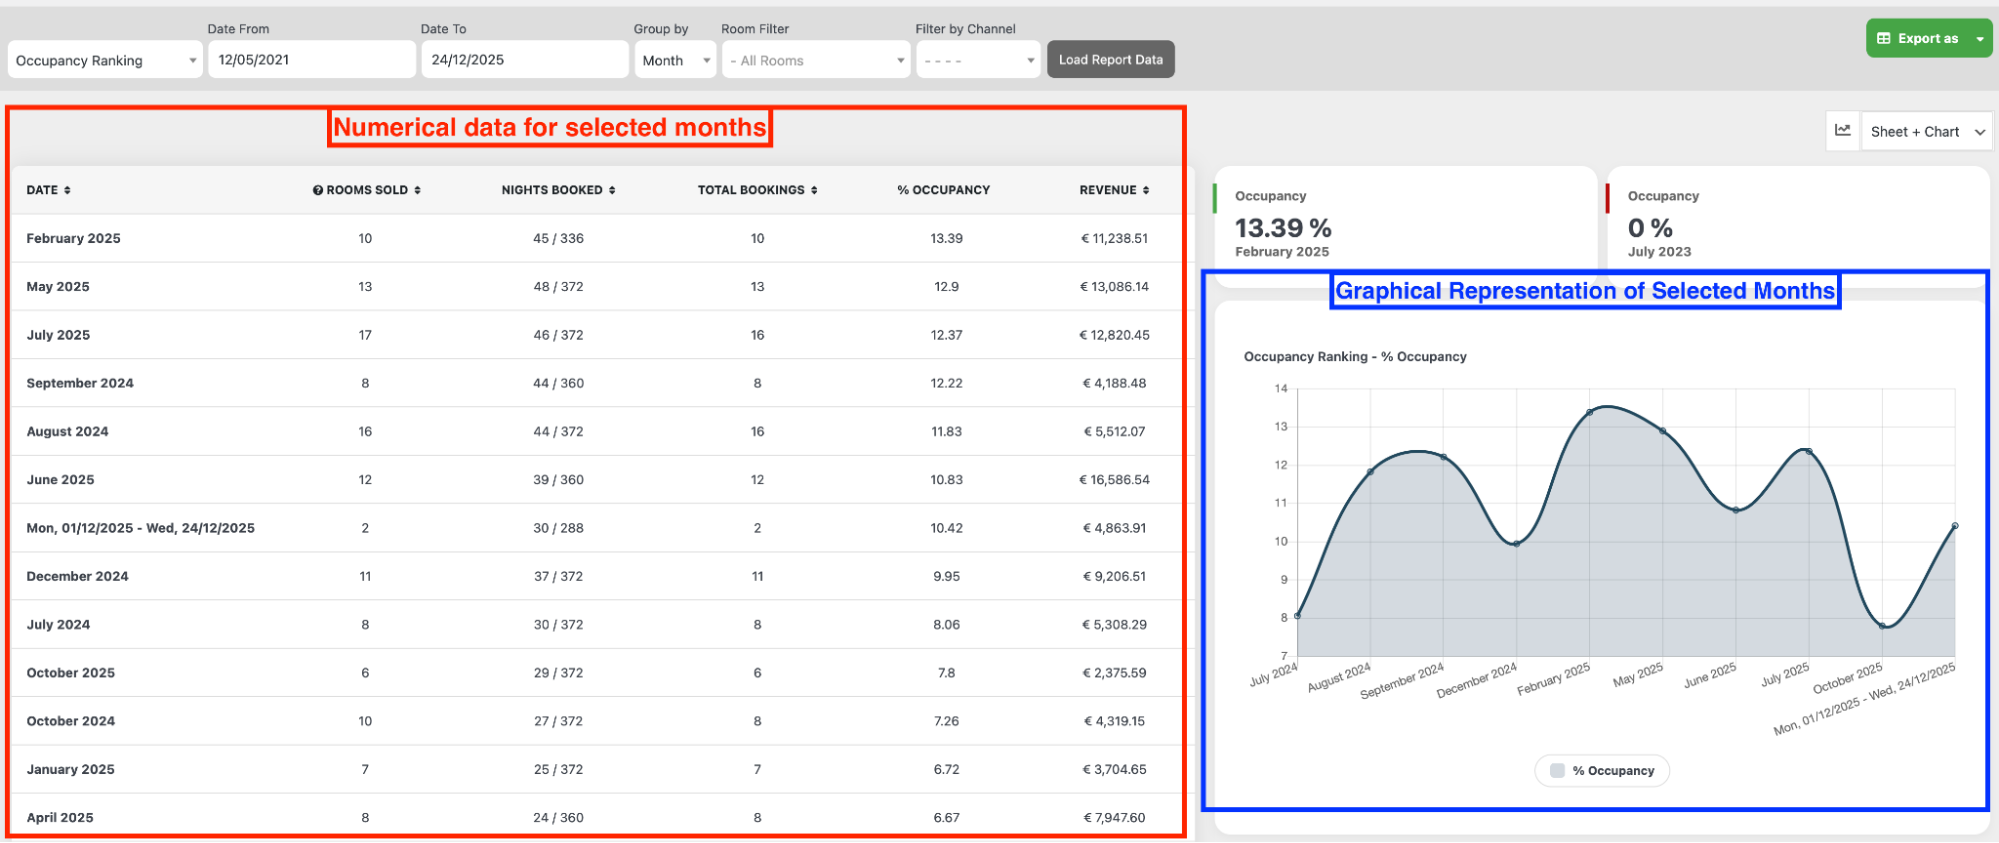
Occupancy Ranking
The Occupancy Ranking Report provides detailed statistics on your property's occupancy performance. For any selected time range, the report displays key data including:
-
Number of nights booked
-
Total number of reservations
-
Rooms sold
-
Occupancy rate percentage
This report is designed to give property managers a clear overview of how well the property is performing in terms of occupancy and revenue generation.
Additionally, it offers a quick comparison with other months of the year, allowing you to easily identify seasonal trends and gain a comprehensive view of your property's performance across different periods. In addition to numerical values, the report also includes a graphical representation of the data, providing a clear visual reference.
Options/Extras Reports
As the name suggests, the Option/Extra Report displays the number of booked options (also known as extras), grouped by type, for the date range selected in the report filters.
For each option type, the report shows the total revenue generated.
The data is retrieved directly from the options/extras created within Vik Booking, ensuring accurate and consistent reporting.
This report is useful for monitoring the performance of your optional services and understanding how each extra contributes to your property's additional income.
Rates Flow
The Rates Flow Report tracks all price changes made on the website. It is a valuable tool for reviewing past pricing updates and understanding when and how rates were modified.
Every time a price is changed, the report logs the event. Each log entry includes:
-
Date of the change
-
Date range affected by the change
-
Rate plan details, including: "Base rate" and "Nightly cost" (with any applied special prices)
-
User who made the change
-
Notes, which may include additional information such as a minimum stay restriction
This report ensures full traceability of pricing activity, helping property managers maintain control and transparency over their rate updates.
E-invoices

The e-Invoicing system introduces a new way for generating electronic invoices, usually in XML format. Vik Booking provides an extendable framework based on custom PHP Drivers that extend the parent Class. By default, the only Electronic Invoicing Driver that comes with Vik Booking is the one for Italy, for the "Agenzia delle Entrate" institution. Italy is the first country in Europe to introduce mandatory B2B e-invoicing, and this mandate takes place from January 1st 2019.
However, if other countries will make e-invoicing mandatory, adding a new driver to Vik Booking to respect another format will be simple for the future.
*** ONLY FOR ITALIAN CUSTOMERS ***
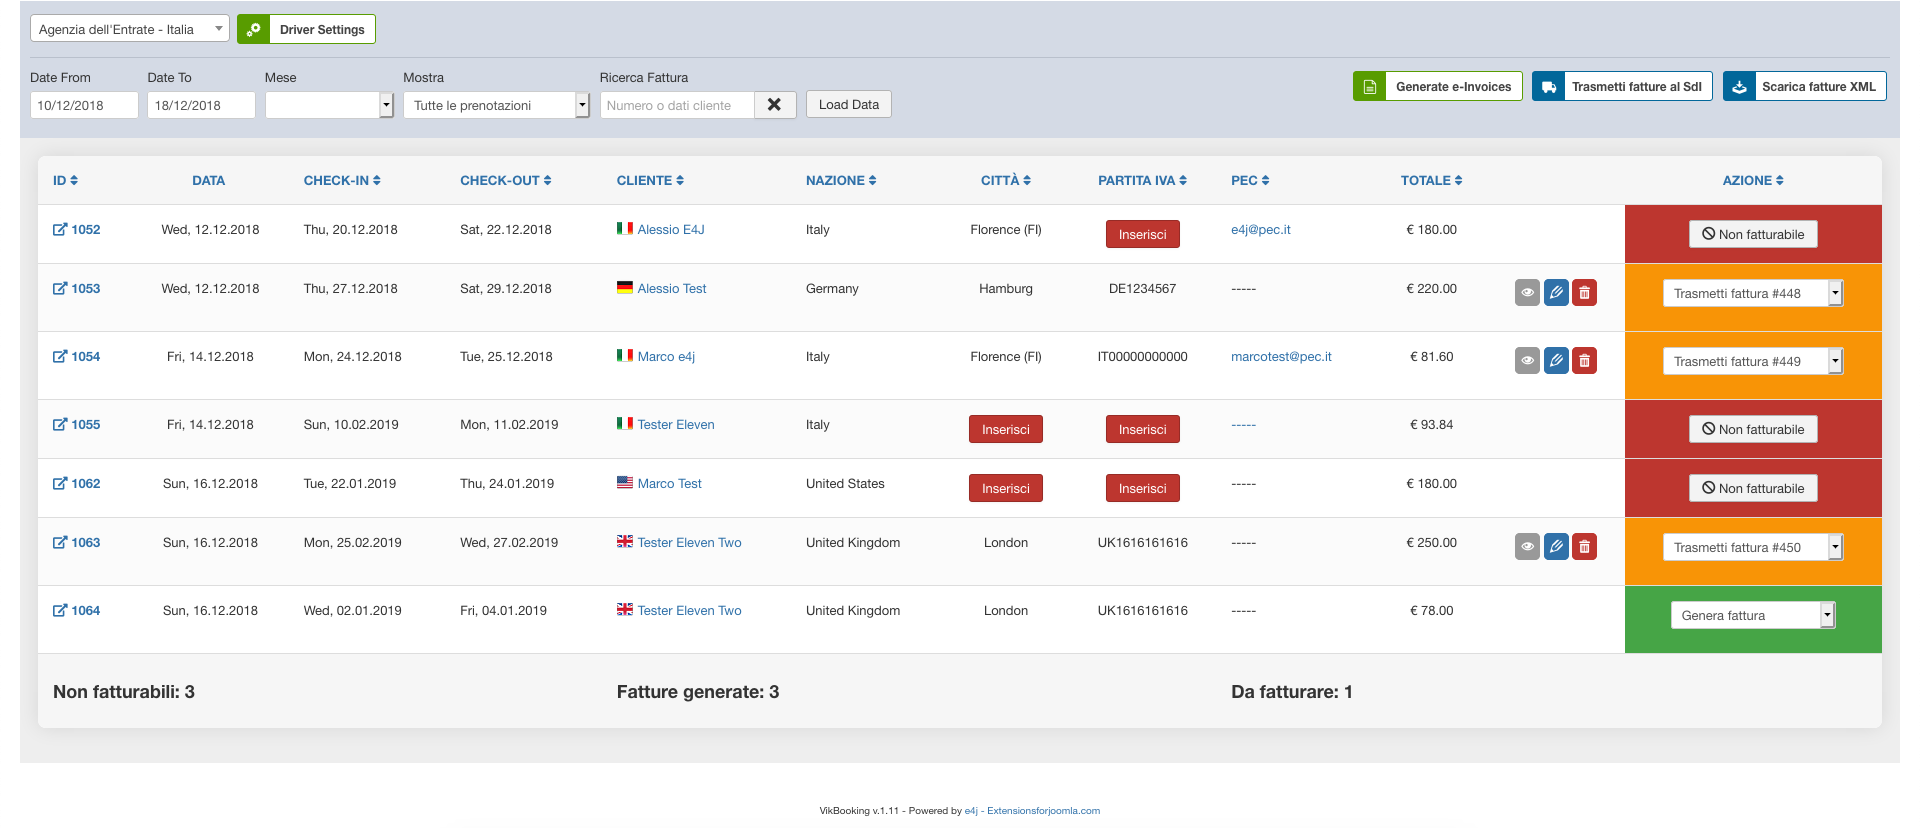
Il sistema di fatturazione elettronica è stato implementato in seguito agli obblighi imposti a partire dal Gennaio 2019. In questa pagina è presente un riepilogo delle fatture fatte per ogni cliente, ed è possibile sia generarle che spedirle direttamente al Servizio di Interscambio dell'Agenzia delle Entrate mediante l'uso della propria casella di posta certificata (PEC). Solo per il primo invio della prima fattura, si deve usare un indirizzo PEC generico (This email address is being protected from spambots. You need JavaScript enabled to view it.), poi sarà necessario cambiare l'indirizzo email con quello che vi sarà comunicato dal Sistema di Interscambio dopo la trasmissione della prima fattura elettronica.
L'interfaccia mostra diverse funzioni, tutte con un commento per descriverne l'utilizzo.
Nel pulsante "Driver Settings" sono contenuti i parametri da riempire per generare correttamente i file da inviare, con tutte le spiegazioni annesse spostando il cursore del mouse su "?".
Come potete vedere, verrà visualizzata a schermo una tabella come quella sottostante, che stampa tutti i dati della prenotazione del cliente con lo stato della fattura all'ultima colonna. La stato della fattura può essere:
- Da generare: la colonna sarà di colore verde. La fattura deve essere generata cliccando sul pulsante in alto "Generate e-invoices". Una volta generata, sarà anche disponibile per il download attraverso il pulsante in alto.
- Da trasmettere: la colonna sarà di colore giallo. La fattura deve essere trasmessa attraverso il pulsante " Trasmetti fatture al SdI"; se la fattura è una sola, allora trasmetterà un file XML, se sono più di una allora trasmetterà un file zip di tutte le fatture da trasmettere.
- Trasmessa: la colonna sarà blu, non è necessaria nessuna azione ulteriore.
- Non fatturabile: la colonna sarà rossa. La fattura assume questo stato in caso ci sia qualche dato obbligatorio mancante.
La fattura può anche essere vista e/o modificata a mano via XML attraverso i pulsanti nella penultima colonna. Inoltre, essa sarà rigenerabile in caso di modifica.
Per generare la prima fattura elettronica occorre prima controllare le impostazioni del driver, per ciò che riguarda anche le impostazioni della vostra casella PEC. Inserendo le date in cui sono state ricevute le prenotazioni, il sistema carica i dati cliccando sull'apposito tasto.
Come elencato sopra, le fatture generabili, ovvero per quelle prenotazioni comprensive di tutti i dati obbligatori, avranno uno sfondo verde. Cliccando sul tasto Genera Fatture, il sistema creerà semplicemente il file della fattura elettronica in formato XML (salvandolo nel database, non in un file, quindi in maniera sicura). Le fatture generate e pronte per essere trasmesse, avranno uno sfondo arancione. Per inviarle via PEC al Sistema di Interscambio dell'Agenzia delle Entrate (il driver di Vik Booking si occupa dell'invio telematico), è sufficiente fare clic sull'apposito tasto "Trasmetti Fatture al SdI".
Per la prima trasmissione di fattura elettronica è importante selezionare una sola fattura che deve essere inviata all'indirizzo PEC predefinito dell'Agenzia delle Entrate. Così facendo, il loro sistema vi assegnerà un indirizzo PEC specifico alla quale trasmettere le fatture. Una volta ricevuto, assicuratevi di aggiornare le impostazioni del driver cambiando l'indirizzo PEC del SdI. A quel punto potete trasmettere anche 50-100-200 fatture alla volta, ed il sistema si occuperà della trasmissione in formato ZIP, nel caso ci siano più fatture da trasmettere.
MODALITÀ DI TEST: se la Fatturazione Elettronica dovesse spaventarti, ti basta cambiare dalle Impostazioni del Driver l'indirizzo PEC del SdI (Sistema di Interscambio), inserendo magari un tuo indirizzo email, non per forza di tipo PEC. Così facendo, il sistema trasmetterà le fatture elettroniche all'indirizzo email specificato, piuttosto che all'Agenzia delle Entrate. Così potrai visualizzare i contenuti e testare il sistema. Ovviamente serve sempre un indirizzo PEC configurato correttamente per l'invio dei messaggi. Una volta appurato il funzionamento, puoi cambiare l'indirizzo PEC del SdI ed iniziare a trasmettere dati reali.